Molding Ambient Light – part 2
This article is written by a member of our expert community. It expresses that member’s views only. We welcome other perspectives. Here’s how to contribute to MM EDU.
For this post I will be talking about how I shoot backlit photos (sun behind the subject). As with everything photography related, there always are tons of ways to do things. My way may not be the best for you, but I consider this article successful if just one person reflects on the information provided and is able to come to some sort of understanding about their photography.
Back lit photos, by default, result in a halo of light around the edges of your subject. Depending on the amount of reflected light hitting the subject’s face, the background may or may not be partially or fully blown out. I’m sure some people are cringing at the thought of parts of their images being blown out, but I find that it’s acceptable for my back lit images, and it doesn’t bother me one bit. Whatever the case, we will cover how to go about controlling the exposure of the background in backlit images in this article.
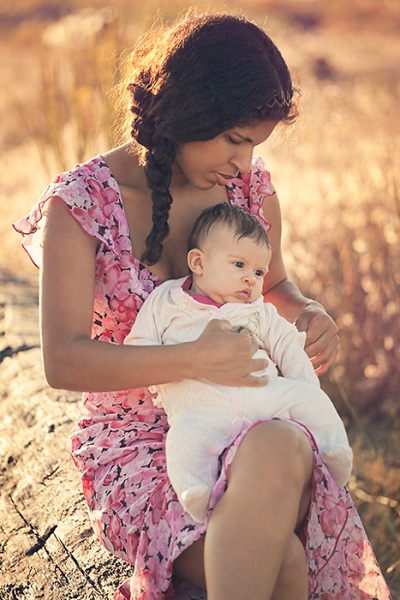
Here are a few of my back lit images. The first one is of my wife Luciana and daughter Belinda, shot at the beach.

For this image the sun was low in the sky (about an hour or so before sunset) and the sun wasn’t directly behind the subjects, but rather off to the left side of the frame a bit. One of the reasons I chose to have the sun off to one side was because the reflection of the sun in the water was acting as a second light source and causing flare—having the sun off to one side allowed me to reduce the flare from the image. The reflection of the sun in the water was probably the biggest obstacle I had to overcome to get this photo. I had Lu and Belinda sit down and shot from just a bit higher than I normally do in order to keep the water (and the glare from the reflected sun) out of the picture.
This photo (as with most of my photos) was metered for the subjects face and shot at the indicated exposure. As you can see this resulted in the background being “overexposed”, but not blown out. If I would have included any of the sky or the water (which was reflecting the sky) in the image, there would have likely been some areas that were blown out. Also helping to keep the background within the sensors range were the facts that I had them sit down and that there was an expanse of sand in front of the subjects. This brings us to a few key points to consider for back lit shots
- The reflected light off of the environment in front of the subject (the sky and in this case the sand) is the key light.
- The reflected light is typically, but not always very soft light.
- You can adjust the background exposure by controlling the intensity of the key light.
I already discussed and explained the first two points in my previous Molding Ambient Light article, so the only one left to explore is the third point. Luckily, it’s fairly straight forward. Basically, the brighter your key light (remember were metering the models face for a “normal” exposure), the darker your background will be in your image. Nobody has the ability to affect the background exposure, but you have total control of the amount of light hitting your subject. If your background is too bright, simply bring in a reflector or two (I like white to match the softness of reflected ambient light), or move you subject closer to a natural reflector. Some examples of natural reflectors include sand (ever wonder why you see so many successfully back lit images on the beach), light colored buildings, and other large light colored objects that you may find. When searching for natural reflectors, neutral objects are almost always preferential in order to prevent color casts.
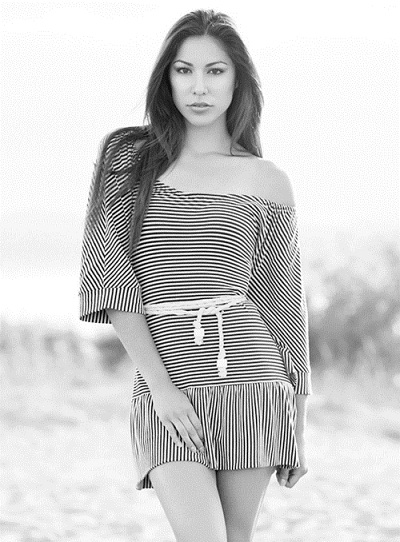
Moving on, this is the next image of Kimmy, which was shot on a sand dune at a local park.

This shot, like the previous, was shot in the sand, so I had a nice natural reflector going on for the key light. Unlike the last image, I included quite a bit of the sky in the background, which resulted in a large portion of the background blowing out. As mentioned previously, I don’t mind the blown out areas, and actually think that they can add to the ethereal quality of back lit images.
If I wanted to reduce the amount of the blow out in the background, I would have brought in a couple of white reflectors in order to reduce the exposure indicated by the light meter at her face. Pretty simple, huh?
This next image of Talisa was shot in front of a barn.

For this shot I positioned Talisa in front of a light-colored barn. By varying the distance between Talisa and the barn I could control the background exposure. I positioned her at a distance that prevented her edges from blowing out, but allowed the background to blow all out, for the most part. Once again, the distance all comes down to personal preference, but you need to know that that is the parameter available to you, in order to control it.
This final image of Briauna was shot in a studio window.

Unlike the previous shots, there was no direct sunlight hitting the subject in this image. The back light was reflected off the sky and building behind Briauna (north facing window), and the key light was a reflection off of the white studio walls of the reflected light off of the building and sky. This was an unplanned shot, but in retrospect, the reflected back light provides a much softer light than using direct sunlight. Just make sure you have a fast lens if you want to do a shot like this, because your shooting with relatively little light.
In closing, I would also like to leave you with a video of Jim Jordan shooting backlit images with natural light, using California Sunbounce products. The video has some awesome shooting in it, but more importantly it’s also one of the most inspirational photography videos that I have seen. I still go back to the video every so often to hear his inspirational words. You can watch the video here.


December 30, 2011 at 2:09 pm, Creative Hands Studio said:
Thanks for sharing this info, I love shooting outdoor natural lighting photos and this has really helped alot. Thanks
December 29, 2011 at 7:58 pm, Chris said:
Well Done, Robert. Great information. Love your work as well.
December 28, 2011 at 3:31 pm, Mike said:
great article, thanks. The video was awesome too, it’s a shame we dont get as much sunshine here in the UK!!
December 27, 2011 at 1:28 pm, Mark Salo said:
Great submission!
December 26, 2011 at 7:46 pm, Julia said:
Thank your for this article. Learned some helpful techniques. I loved te video at the end. Never heard of him before. I found him refreshing. Love the energy he exudes.
December 26, 2011 at 2:00 am, Zaja said:
I LOVE this!!!!!
December 20, 2011 at 3:11 pm, MotionPictureLightingTech said:
You should also look into the strobist style of shooting into the sun. You will get much better results. I prefer reflectors when I attempt shots backlit by the sun and apply strobist techniques also. They make for a much better exposed image that requires less post work.
December 20, 2011 at 8:12 am, Justin Snapp said:
Robert, can you expand on the following statement: “By varying the distance between Talisa and the barn I could control the background exposure.” Why is this true? I am imagining that the barn is behind Talisa and the sun is still further (sic) behind the barn. Is it instead that the barn is behind the camera and the reflection from the barn is illuminating Talisa’s face? In that case I would understand how the distance between the barn and Talisa effects the exposure.
December 20, 2011 at 3:38 pm, Robert McCadden said:
Sounds like you got it Justin; if your exposing for the model, the more reflector you use (in this case the barn), the less your indicated exposure is going to be. You can’t control the light hitting the background, but by adding more light to the model you can effectively reduce the exposure of the background.
December 20, 2011 at 3:10 am, Keithdewey3 said:
Thank you for sharing this and taking the time to write the article.
December 20, 2011 at 2:57 am, Clarus360 said:
Nice submission, much better than the last stuff thats been popping up… KUDOS and Aloha! Eric
December 19, 2011 at 6:53 pm, Ranger said:
Well done. This is the type of submission that the Edu page needs more of.
December 19, 2011 at 6:47 pm, Joseph Francis said:
I find it tricky to get a lively catch-light in the eyes under these circumstances since the subject usually has his or her back to the best light.
December 20, 2011 at 5:57 am, Robert McCadden said:
I understand how you could intuitively think this is true; however, if you are exposing for the models face I think you will find that backlighting them will actually give you better eye light than direct light.
When front lighting the model w/ natural light the sun is giving like 90% (arbitrary and approximate ammount) of the light and the enviornment that they say is giving the other 10%. The result is that you get a catchlight of the sun (if you manage to get them to look into the sun).
Backlight them and the entire enviornment is the key light; you get a catchlight from everything in front of their face (including you).
Try it yourself. Go to some random place, havea model face the sun, meter, and shoot. Then have the model turn 180 degrees, meter at their face again, and take another shot. Unless the model was looking at the sun (not reccomended) in the first shot, you will get a better catchlight from the second shot.
Quality of light is subjective as well. Direct sun is hard light and reflect light from the enviornment is more often than not soft.
December 20, 2011 at 6:50 am, Joseph Francis said:
That’s true in the situation you describe, but what I see a lot is people shooting someone standing in a doorway looking into an interior space.
December 20, 2011 at 6:53 am, Robert McCadden said:
That is just bad lighting like you said, lol.
December 19, 2011 at 6:33 pm, Joe Diluigi said:
outside is so rewarding controlling ambient light same w/studio light experimentation is key try bouncing light off ceiling and walls,you’ll find different moods in the same lighting by changing the angle you shoot from……….Joe
December 19, 2011 at 6:19 pm, Kalospix said:
Nice stuff! This nicely shows your style and way of using the light to create real nice work.
..a thought about light management is that once you understand it, in the end there are so many ways to use it, to create different effects based on color temperature, direction, quality and shadows. The options are endless.. you depict some nice techniques and wisdom. Thanks for sharing.
Jorge
December 19, 2011 at 5:31 pm, Troy said:
Very well articulated and documented. Aloha and mahalo, Troy