Creative Lighting – part 2
How do we view reality? How contrast sparks our interest
I have for years pondered how to render 3 dimensions on to 2 dimensional walls and surfaces, or how to add greater topographical richness to predictable lighted interior landscapes.
Our brain, through our eyes and life experiences, allows us to determine how light will be rendered in our familiar environments and, as a result, we are rarely surprised when we turn on the corner lamp of our room, or the sun comes shining through the picture window in the library.
But have you noticed that, when those rare lighting anomalies occur, we stand up and take notice? When the sun peaks through thunder clouds while it is raining, giving a stark contrast to what would be a very common landscape. We feel the same effect when lightning strikes and lights up very specific portions of a scene, and when a point of sunlight hits a glass and renders a mini rainbow in its wake.
Well those are the types of illustrations I find appealing and attempt to recreate in photography. I have always been drawn to the symbology of the “light at the end of the tunnel”. That is, in its own right, a reflection of my own being, and I won’t attempt to go into a self analysis of why that is, but I just wish to say that contrast is important to what I render.
Less common light modifiers—get creative
There are many ways to accomplish these effects in photography, and some are more extreme than others. Some have more subtle gradations and others are quite frankly polar opposites and quite stark. How you use these tools will be based on what “YOU” are attempting to express; ultimately it is “YOU”, the artist, expressing your vision of how you perceive reality.
One of the tools I enjoy employing are those that partially obstruct light to varying degrees. For example, I often use empty vases, or vases filled with water, or glasses placed in line, and shoot light through them, onto the surface of the space I am shooting in. I may use a honeycomb grid, a snoot or barn doors to control the size of the opening from the light source. I have often used a combination of all three, and often more. Moving the light source closer to the objects will spread more light on to the space and will render the effect with more subtlety. Moving the objects further from them will enhance the effect. Play around and experiment. You’ll be quite amazed by what can be accomplished.
I have often had accessory stylists order different plants to bring to shoots, and then aimed my light source at them to cast exciting shadows onto the background of the images I am rendering. Some plants are more transparent than others, and light will bleed differently through all of them. Again, the rule of closer and further applies here.
Another technique I have employed that you may find interesting is to shoot through objects that give you a subtle vignetting. It is akin to shooting partially above and below the water line. Using a mix of opaque or transparent objects will aid in realizing the effect.
In all of the above cases, I recommend a mix of continuous light and flash light sources to add interest to your lighting composition.
What I am attempting to accomplish here is to influence how you approach light. Your interpretation and employment of tools around you, that can be used to accomplish exciting and unusual effects, is another objective.
I have only scratched the surface here, but hopefully I have sparked some ideas for you to explore.
This article is republished from Benjamin Kanarek’s blog: What Kinds of Lighting Accessories are Needed to Sculpt or Paint with Light?
Benjamin Kanarek
Benjamin Kanarek is an international fashion and beauty photographer. Ben is currently based in Paris, where he shoots for several of the International Editions of Harper's BAZAAR and VOGUE Magazines, and L’Officiel Paris etc. View more of his work at BenjaminKanarek.com and BenjaminKanarekBlog.com.
Follow Me:


April 11, 2012 at 3:53 pm, Lvproimaging said:
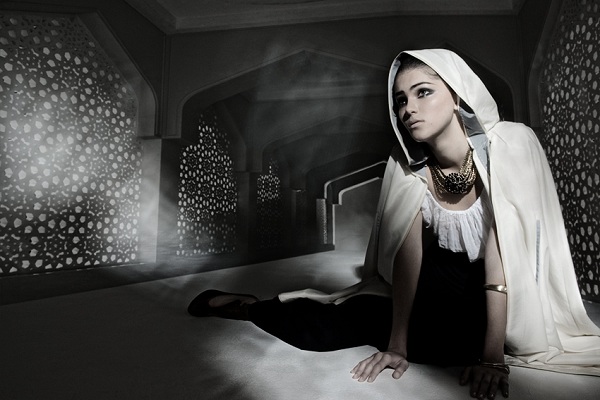
I agree with Fotoshop on but one observation. Along the models black leggings and outfit there should be a degree of light spill onto the black and a slight cast shadow. There is not. None the less the image in it’s self is brilliant.
Benjamin is a master at what he does rightfully so. The intent here is not to critique the presented image but to open ones mind and provide challenge to the eyes perception by use of common objects used in an uncommon fashion.
April 11, 2012 at 8:17 am, Fotoshop said:
The information contained within the article is good.
However, the accompanying photo is a cheat. It’s a photoshop composite and not a good one at that. I suspect (strongly) the arabian hall is CGI. The shadows the girls body casts do not match the light sources depicted in the photo. Further, her vanishing point doesn’t appear to match the structure’s vanishing point.
Why Benjamin Kanarek would use that image as an illustration befuddles me, as his work is regularly far superior to this image.
just my two cents.
April 10, 2012 at 3:19 pm, Model T said:
LIGHTING is everything! Thanks for the article 🙂
April 10, 2012 at 2:10 pm, Leah Vang said:
I’m inspired! Thank you for the artticle!
April 10, 2012 at 11:54 am, Ahamed said:
Brief but excellent article. Thanks!