How to shoot a fashion editorial with a ring flash
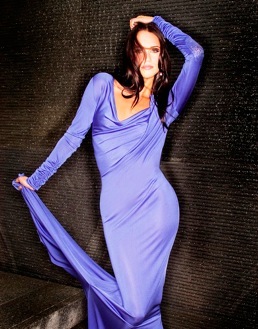
Although a very simple lighting set up, ring flash can be fantastic or a complete disaster, if you’re not careful. I will describe the steps I went through to achieve the fashion image bellow.
Photographer: Bruce Smith
A little background
First, what is a ring flash? The ring flash was developed in 1952 by Lester A. Dine, as a dental/medical photographer’s accessory.
As its name suggests it is basically a flash manufactured to fit around the front of a lens, allowing for flash lighting of macro photography. These days they come in 3 main sizes. The first is quite small, as per the traditional ring flash for shooting dental/surgical procedures. It’s designed to allow the photographer to work within an operating theatre environment, without using a cumbersome traditional on camera flash or off camera flash kit, which takes up space and can get in the way of operating theatre procedures. This gives the photographer the ability to shoot operation procedures close up.
The ring flash used was specifically designed to use for portrait/fashion photography.
These used to come in the other 2 main sizes, a 9-inch ring flash from companies like Broncolor or Profoto, or 12-inch ring flash from Bowens or Elinchrom. Due to the popularity of the 9-inch version, being more portable and designed so you can shoot hand held with the ring flash attached to your camera’s tripod screw, plus the range of modifiers and accessories being available, the larger ring flash seems to have stopped being manufactured.
The image
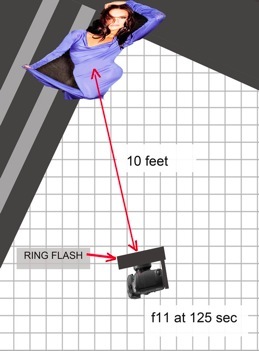
This image was shot with the Nikon D100, with an 18 to 35mm Lf2.8 lens, fl was at 27mm, exposure was f11 at 125 sec, at 200asa (iso). The ring flash was set to give a reading of f11, with a flash to subject distance at approximately 10 feet.
The storyline for the editorial was glitzy celebrities out to play, so I chose to give the images a paparazzi press shot look by shooting the whole fashion story with a ring flash. It gives a hard, bright, shadowless illumination on your subject and, if your shoot close to a background, a shadow all around your subject. See the image below. You can use a diffuser, a honeycomb grid, or leave the flash with no modifier to give a really hard light. I chose to tape some 1.5 stop scrim diffuser over the flash to soften it just a little and keep the press feel to the lighting. See other images from the editorial below.
The ring flash I used has no censor, so once you have taken the flash reading you must keep your flash/camera to subject distance the same for every shot, or adjust your settings/power output accordingly. If you move closer, you will over expose, further away and you under expose. Also it’s always best to keep the ring flash parallel to your subject, at mid height to your model. Too low and working close, as I often am, gives fast fall off, so your model will not be evenly lit from head to toe. I usually stay at mid height level to my model. You will notice that the lighting, if you get it right, appears to be soft and can hide a multitude of sins, i.e. wrinkles etc. I still brief my makeup artist that I will be using harsh light, and to make sure makeup is very matted, unless I’m after a shimmery look.
Like any lighting set up your not familiar with, it’s always best to experiment before you shoot to make sure your results are as you wish them to be.
A little about my workflow
I always shoot a raw file and a small jpg, and drop them into separate folders when transferring image files from my flash cards to my computer. I also copy the image files onto an external hard drive as backup. The small jpgs I burn onto CD or DVD, to give to my clients, so they have a complete set of small jpgs from the shoot to do their selecting with. I know it’s antiquated but I like to do a manual workflow and to be in control of my image files.
My editing process is done with the small jpgs mainly for speed. When I have narrowed my choices down to 3 or 4 options, I transfer the final choice images into the folder containing my raw files. This highlights the raw files to be batch processed in camera raw into usable images files.
I’ll talk more about my work flow in another article.
Post-production/Photoshop retouching
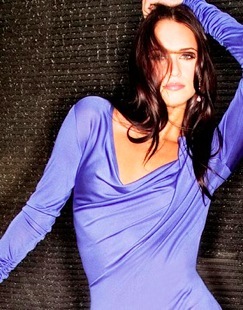
I chose a different but similar frame to the one above to work on.
When the image has been processed in camera raw, I assess what is needed to be done, apart from the initial exposure and contrast. With an image such as the image left, which is the un-retouched, processed raw file, as you can see, the image lacks contrast and is not quite as saturated as I would like.
Below are the various steps I did in Photoshop to make the image as I envisaged when I shot it.
Assessing the image
In order to put some punch into the shot, I darkened the wall behind my model, then added some contrast to the dress, brightened up her skin, darkened/enriched her hair, and slimmed down her waist just a little to emphasize her body in liquefy. (The dress was stretchy and sort of hid her waistline.) I created a mask to protect the areas of the image I didn’t want to alter.
Apart from the above, there’s not a lot I would do to this image.
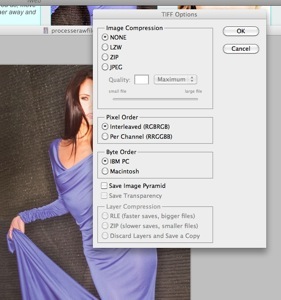
Step 1: Save as a tiff
I like to keep a master of the processed un-retouched images files and work on a copy of the image tiff.
When saving As, make sure you check the IBM box in the byte order box, or people using PCs will not be able to open or use the tiff image.
Because there is so little Photoshop to be done on this image, and since the retouching I will be doing is not destructive, I’m going to work without using layers.
Step 2: Increasing the overall contrast

I used Image, adjust, curves, dropping the lower section of the curve down to increase density, and lifting the top section of the curve to lighten the brighter areas of the image. This gives the image more contrast and punch, and increased saturation.
Step 3: Darkening the blacks to add more punch
I used Image, adjust, selective color, selected the color black from the drop down menu, and slid the black slider to the right until the blacks were darkened just enough to create a little more punch.
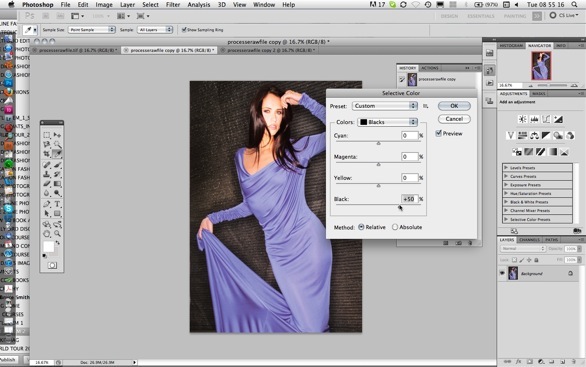
Be careful not to add too much when using selective color adjustments to your images, or it will start to block out the chosen color.
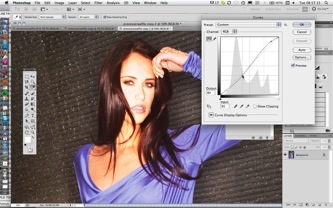
I also added a little more contrast and lightened up her face in curves. See image above.
Step 4: Adding vibrance
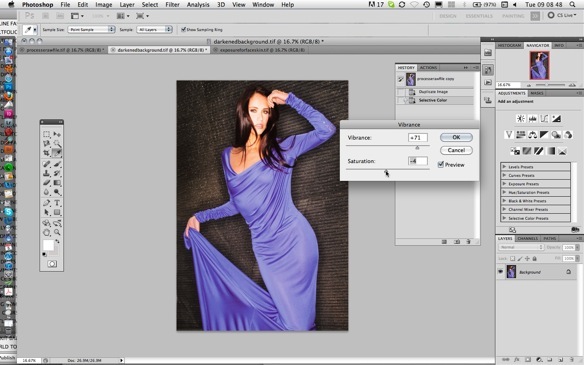
To lift the vibrance of the image I used Image, adjust, vibrance, and moved the vibrance slider to the right. This increased saturation a little too much, so I cut back some of the saturation to compensate.
Step 5: Creating a mask
I created a mask to protect the areas I didn’t want altered. To do this I selected the easiest areas to make a magic wand selection of– the model and her dress.

With the magic wand select tool set at a tolerance of 32, I clicked on the model’s dress, automatically selecting a large amount of what I wanted by holding down the caps key and clicking again and again to select each area I wanted to select, i.e. the varying tones on her dress, her hands, her face, her arms etc.
When all was selected, I inversed the selection so the background/wall behind the model became the area selected. It’s now almost ready to be adjusted in curves. BUT like the magnetic select tool, the magic wand can be unpredictable and needs some adjustment to make sure you made a good selection of the areas not to be adjusted in step 7.
Accurate selection: Turn on the red mask by clicking the box with a circle inside. (It’s at the bottom of your tool bar.) This highlights the areas selected and not selected. Like in the previous fashion lighting and Photoshop tutorial, you can add to either the selected or not selected areas by painting in or erasing the mask, using either a hard edge or feathered edge on the tool and using different sizes for more intricate areas. See image bellow.

Feather selected edges: Now that I created an accurate selection separating my model’s body from the background, I clicked off the red mask. Now I need to feather the edge of the selection by just 2 pixels, which will help to not show an obvious edited edge between my model and the background.

Step 6: Darkening the background
To darken the background I used, Image, adjust, curves, pulling down the lower section of the curve to darken the background and lifting the top section just a little to increase the contrast.

Keeping the selection on, I inversed it to be ready to open the image in liquefy. When opened in liquefy, it will look like the image above. I did the liquefy on the waistline before cleaning up the selected areas, hence the mask still showing in areas of the image that will not be adjusted in liquefy.
Step 7: Liquefy waist
In filters, I clicked liquefy. The image opened in a liquefy window. The masked off background areas were red, as in the image above. The areas to be liquefied/slimmed will not be masked off.
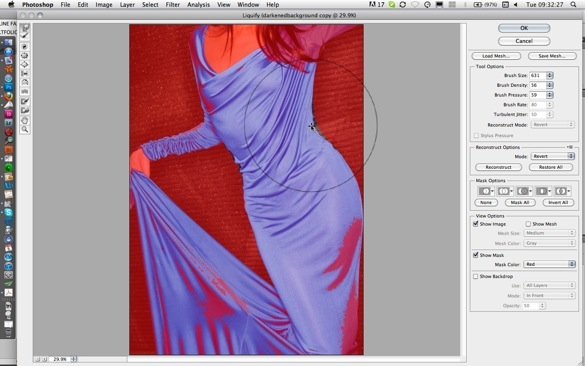
I selected the Forward Warp Brush. (It’s the top tool in the tool bar on the left of the liquefy window.) In the brush size box on the panel on the right of the liquefy window I adjusted the size of the brush to be big enough to cover more than the area of the waist to be slimmed. I placed the center of the warp brush on the edge of her waist, and clicked and dragged the waistline in just enough so it still looks natural. As you can see, I slimmed the waist slightly on either side. The area of background now showing outside the masked area will be retouched in the next step.
See the difference in before and after images.

Before
You need to be careful to keep the waistline looking natural.If you look closely you’ll see that the wall behind and adjacent to her slimmed waist is slightly stretched. I’ll show you how to correct this later.

After
Step 8: Retouch damaged background

I created a new selection of the model’s dress, much the same as in step 5, so I could mask off the dress from the background. I then reversed the selection so I could use the cloning brush to pick up undamaged areas of the wall behind and clone them back in right up to the edge of the dress. Notice how I lined up the lines of the wall before clicking, so you can’t tell I used liquefy. This would have been noticeable if I had not cloned back in the damage edges.
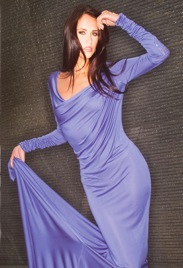
The finished image
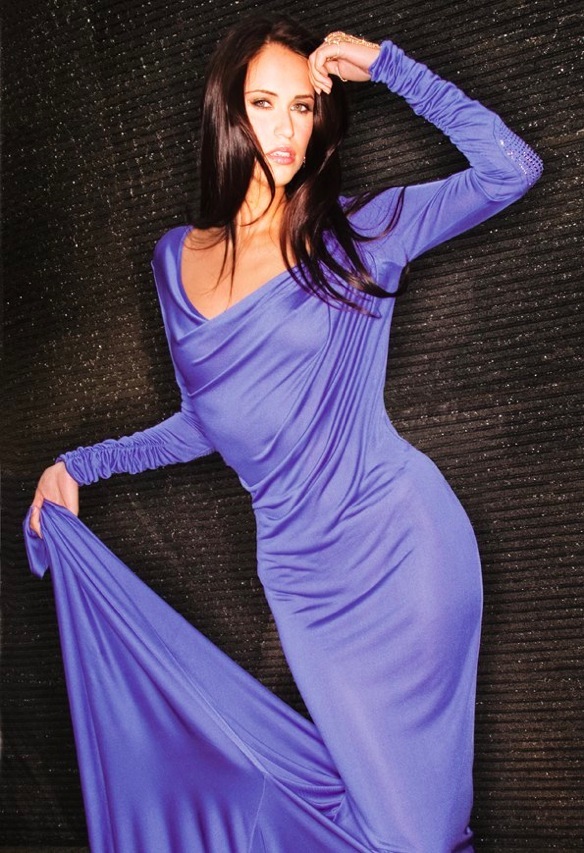
Photographer: Bruce Smith
Bruce Smith
Bruce Smith is a world-class fashion and beauty photographer whose work has appeared around the globe for more than thirty years. He's the author of "Fashion Photography: A Complete Guide to the Tools and Techniques of the Trade" and teaches workshops internationally. His website is www.brucesmithphotographer.com.
Follow Me:


January 29, 2017 at 11:41 pm, Dinar said:
Is it just me or the Model’s face is over exposed ?
March 27, 2015 at 11:50 am, Lawrence Keeney said:
Hi Bruce,
I really liked your tutorial on the ring flash. I have and
use two Alien Bees ring flashes, the ABR800 and the ZRM-1 with the
2500Watt power pack. One of the best shoots I did was a fashion show at a
Las Vegas resort out at the pool at night. Unfortunately, the only
light for the fashion show was the light coming up out of the swimming
pool. I had brought my ABR800 ring flash and got some great shots.
You mentioned having to change camera settings as you get closer or further
away from your subject. This is a very important aspect of shooting
with a ring flash. I made a chart which has distance in 2 foot
increments from 2 feet to 14 feet, and six power levels from 1/32 power
to full power. You read this chart by estimating your distance and the
aperture setting, and then read the power level you should set the flash
to. I printed this chart on a piece of 1-1/2″ x 7″ paper and have it
taped to the top of the ring flash. This way I don’t have to guess at
the settings I need for a particular shot. Of course you have to be able
to estimate the distance between the camera and the subject.
October 29, 2013 at 5:34 pm, TJPhoto40 said:
There are several informative details about this article, with an emphasis on post-production that’s helpful because most ring flash images need at least some tweaking to achieve that special brightness and contrast. But I think you omit some key things. First, you don’t define the look of a ring flash lighting, which is that unique specular light with distinctive halo shadow around the subject. It’s also important to note that the ring flash look is best when the model is close to a background like the one in this demo so that the distinctive shadow is visible and contrasts with the brilliant ring flash light itself. A fairly dark room works best, so no extraneous light will undercut the ring flash lighting effect. But it’s worth mentioning that the ring flash produces a great light outdoors when overpowering the sun, for example, if you get the conditions worked out properly.
In addition, it’s been my experience that shooters need to be conscious of red eye risk, especially when shooting in a room with otherwise dim or no light and with a ring flash that lacks a strong enough modeling light built in. So a second light somewhere nearby can serve to dilate the pupils and prevent red eye, with the second light at a lower modeling lamp setting so it’s just for the purpose of dilating the pupils. What’s more, some ring flash units produce a rather strange donut of light in the eyes–a bizarre catchlight, in my opinion.
You mention two expensive ring flash units, but fail to mention the much more affordable Alien Bees AB800, which is a self-contained monolight ring flash. With the Profoto or Elinchrome, you pay big bucks for the ring flash and also need a fairly strong power pack to supply the power to it. Most people don’t want to spend $2000-4000 just to shoot ring flash. For a fraction of that, the AB800 is surprisingly powerful and yet portable–lightweight and with the power built right into the unit itself. Sure, its price is related to its rather flimsy plastic construction, so you don’t want to be dropping it or banging it around. But it’s an inexpensive way to get surprisingly good ring flash images for a reasonable price, and it can be hand-held with relative ease.
The images shown here are very much in the vein of a standard ring flash effect, but in my opinion the model’s face is too hot–overexposed relative to the rest of her. I think it’s more desirable to keep the face more closely balanced with the rest of her, maybe just slightly brighter without calling attention to the extra light on her face. Maybe that’s a matter of taste, but in this case I wouldn’t want to blow out the face.
I’m glad you included some post-production details, but I don’t think tweaking the waistline with the Liquify tool is integral to the ring flash process.
Anyway, I hope people will try this out as you suggest but consider alternative units that are less expensive to at least get started.
January 09, 2013 at 11:40 am, Gene said:
Great tutorial, but I might add a couple of workflow-related items and a low-cost ring-flash alternative. There is a constant-on fluorescent ringlight available on Amazon for around $160 that has more than adequate power and that can be used for video as well as photo work. An advantage of the constant-on light is the inherent modeling-light quality of it – what you see is what you get. This tends to make set-up quicker. Regarding the workflow – many of the adjustments you are making could be made in Lightroom, on the first image in a series, then applied to the series as a whole. When shooting in studio, a ‘series’ will tend to have similar lighting and composition, thus this should be useful – I know it works for me. Finally, I personally like the warp tool instead of liquify in PS – I see it as giving me more control. When it comes to camera raw – using Lightroom means you’ll never even need to take that extra step, which has to be taken per image when going your route. (Do stick to Lightroom 4.x – many improvements.)
January 09, 2013 at 10:48 am, Tony said:
Hi Bruce,
This was an excellent tutorial, from concept thru detailed workflow and technique. Really like the precise descriptions!! Thank you! Tony
December 28, 2012 at 9:13 pm, Curtis said:
Thanks Bruce, love the image. I appreciate and admire how you handle criticism. Taste is a funny thing. Do you have any video tutorials available.
December 29, 2012 at 2:43 am, Bruce Smith said:
Many thanks for your appreciation as well as your admiration of how I handle criticism. 🙂 Every one is allowed their thoughts. We can not all be perfect. I would love to see the work of those that do offer up their ideas, maybe links to images they have produced that meet their own expectation. Once again many thanks for your contribution. Bruce
December 21, 2012 at 3:21 am, David A said:
The finished image still needs some work
December 21, 2012 at 3:33 am, Bruce Smith said:
Surely thats a subjective matter… Out of curiosity explain.. Thanks for the observation. Bruce 🙂
December 19, 2012 at 2:45 pm, Dave Oliveras said:
Great post. FIlled with useful information and clear step by step illustrations. Great job. The shot is awesome. Ring flash technique is one of my favorite looks.
December 15, 2012 at 7:43 pm, estudio19fotografia said:
thank you bruce . wich is the max distance u can work with good resuls ? and wich longest focal lenth for a foto from knee above please
December 16, 2012 at 8:45 am, Bruce Smith said:
It depends on the power of your ring flash. The guide number of your flash divided by the number of feet gives you your f number.. As in a guide number of 100 (or EV number) at 100 iso, divided by the number of feet , say 10 gives an fstop of f10. From this you can work it out… Re the lens, this is subjective as well as limited by the focal length and minimum focusing distance. Ill talk about lenses in next comment..
December 16, 2012 at 8:57 am, Bruce Smith said:
Re focal length. This is subjective as well as limited by the minimum focusing distance that any particular lens allows. I use 17 to 55 or 24 to 70mm lenses, I like to be close to my subject for both impact and dynamics, it also being better re communicating with my subject. Either focal length range lets me shoot three close up, three quarters or full length from not so far away that I loose the power output of the flash as well as not loosing some of the effect of the ring flash re the sharpness of the shadow on the background.
I would suggest you experiment, its the best way to learn. If you follow my guide in this article you wont go far wrong..
REMEMBER: If you change your subject to flash/camera distance you need to alter your aperture up or down accordingly… Closer you are you need to stop down and visa versa..
I hope this helps, if you need to ask more questions please do
🙂
Bruce Smith
December 18, 2012 at 8:01 am, ShoShots said:
What do you think of the Ring Flashes for speed lights, and what is another way you would position the ring flash.
December 14, 2012 at 11:39 pm, Amonte said:
This was a grerat presentation for me. I can’t wait for the next article on more about your workflow.
December 15, 2012 at 4:21 am, Bruce Smith said:
Coming soon 🙂
December 16, 2012 at 8:59 am, Bruce Smith said:
Hi Amonte;;
Thank you. Im not sure the next one will be workflow but i will be publishing it over the next few weeks. The choice of article is made by MM.
Regards
Bruce
December 14, 2012 at 10:50 am, Tim Long said:
Many thanks Bruce, for taking the time to write up this article.
December 15, 2012 at 4:21 am, Bruce Smith said:
They say its good to share 🙂
December 16, 2012 at 9:00 am, Bruce Smith said:
Your welcome Tim
🙂
Bruce
December 13, 2012 at 7:35 pm, D. Marc Mabry said:
Thanks for taking the time Bruce!
December 15, 2012 at 4:21 am, Bruce Smith said:
I have lots more articles an their way 🙂
December 16, 2012 at 9:01 am, Bruce Smith said:
Welcome Marc Thanks for your appreciation
🙂
Bruce
December 13, 2012 at 7:23 am, FBY1K said:
Thanks Bruce for this presentation of using the ring flash.
December 15, 2012 at 4:20 am, Bruce Smith said:
Your more than welcome, 🙂