Bridal gown photography: Capturing the exquisite image
The storyline behind this series of images I shot for ESTÉS, one of my oldest bridal wear designer clients, was statuesque and elegant images, shot on a simple but graphically atmospheric and dramatically lit set. So I designed a set that was flexible and easy to move around to a variety of positions on an infinity cove.
Working for so many bridal wear designers, I have to shoot each collection very differently, so I don’t create a conflict of interest. I have to be inventive as to how I shoot, keeping my own style but giving something very different to each client for each season.

Photographer: Bruce Smith
Achieving your client’s objectives
When shooting a commercial fashion collection, one of the most important things to understand is what the client’s needs are. Your images must fulfill the objectives of what the images are meant to achieve. The key factor is to reflect their visual image and the philosophy of their brand. To achieve this you must ask your client, Why are we shooting these images? What do you need them to say and to achieve? There are 3 main purposes to the fashion image: to influence the viewer to be attracted to the brand in advertising images; to reflect trends in fashion magazine editorial images; and/or to sell off the page if the images are for a catalogue. With these in mind, you need to add your input and style of shooting to help your client gain a strong position in the markets where they are selling. You need to understand how their end customer, in this case the bride, wants to feel when she is wearing one of your client’s wedding gowns. Most, if not all, have a desire to be a princess for their special day.
When shooting commercially it’s very important that you provide your clients with images that are artistic and stunning as well as right for their needs, as the images from this shoot are.
Being prepared for a studio shoot
At my briefing meeting with my client I showed him some tear sheets of fashion images shot in a studio using large white panels and boxes as backdrops and props.
Mixing this set concept with his gowns and my suggestions to light the shots very rich and moody, he liked the idea a lot, so I needed to find the right studio to accommodate the shoot.
I chose a studio in West London called Premier Park. They have several very large studios available to rent. I chose studio 2, a large studio space with a perfect infinity cove, just right to build the set design on. It also had plenty of non-shooting space to accommodate a lot of team members, my client, ironing ladies and stylist, hair and separate make-up artists, three models and assistants and myself, etc. The last thing you need is to cram a large team into a small studio space.
The studio had plenty Profoto lighting kit to rent, so no matter what I needed they had it to hand, even the little things you forget to bring with you. I wrote the list of lighting kit I needed and sent it to the studio manager the day before the shoot. All the kit I needed would be in the studio ready to use nice and early in the morning of the shoot day.
I always arrive at the studio or location hours before everyone else is scheduled to be there, especially if I have not shot there before. I like to sit, drink a coffee and get the feel of the space I’ll be working in without distractions. When everyone starts to arrive it can be rather like Waterloo Station at 8:am. I guess the quiet time is a sort of meditation and psyching myself up into the right frame of mind and level of energy to carry me through the shoot day on full battery charge. There’s a lot to do and to think about very fast, as well as a big responsibility in managing the whole shoot and the team, so there’s a lot on the photographer’s shoulders.
In most cases I ask my team to arrive 30 minutes before I expect them to get to work. This gives everyone a chance to settle, say there hellos, drink a coffee, etc, without taking up any of the needed production time with the niceties, and giving those that are traveling by car or public transport a little allowance for unexpected delays.
Pre-production
A few days before the shoot, I commissioned a carpenter to construct eight, 4ft x 4ft x 6in white panels made from sheets of ¾- inch MDF, screwed together into boxes that could be put together to make 8ft high x 4ft wide panels, plus a selection of smaller boxes of different sizes, all painted matt white. These could all be moved around to create interest and to give a variety of shapes to the set. They could also be used by the model to recline or sit on or stand by.
Finding the right team
Due to the volume of gowns to shoot in one day, I chose separate hair and make-up artists to speed up the process of getting the models ready for camera. Eugene for the hair and Michelle for make-up are both very good and professional artists that can be relied upon to achieve the look required, and to do it quickly as well as make very quick changes when needed. When you see the day’s timing you’ll understand why.
Picking the right models
Another important question to ask your client is, What type of model/look is right for your visual image? Models come in all shapes, sizes and looks. Which of these fits what your client feels is right for their brand? Is the model’s figure and height right for the type of images you want to achieve? Is her hair the right color and length? If you’re shooting gowns that have no sleeves or low back or front, are the model’s arms, collar bones and shoulders attractive?
These days, tattoos are very much in fashion. Are tattoos of various types in various places going to be seen and need retouching?
For most of my shoots my preference is for tall, slim, elegant and stylish models with a natural flair. This is absolutely essential for bridal wear shoots. I want my images to be timeless and elegant, reflect the aspirations of my client, and inspire the bride who may be looking to buy one of my client’s gowns. I want to her to look at the images and to imagine herself wearing my client’s gown on her dream day, being the elegant princess depicted in the images I produced for my client.
Like most if not all of my shoots, the right model is essential in achieving the right look and feeling in the images. I always chose my models very carefully to suit the story. Casting the right models to fit the story of the shoot is very important. Get this wrong and your pictures will not be believable.
For this shoot I chose Simona, the model in the main image above, along with two other models that fitted the look required by myself and my client. I shot Simona several times before, and she had experience with shooting bridal wear.
Working only with professional, experienced models and team members is a major factor when shooting for a client that has a lot riding on the images you produce for their collections.
Remember what I wrote about the photographer’s responsibilities: EVERYTHING TO DO WITH THE SHOOT
How the day’s shoot pans out
Another very important question to ask your clients is, How many outfits (gowns in this case) do you need shot?
For this shoot, I had 24 to do in the day, and each gown needed to be shot for front, back and details. That’s a lot to get done in a day. To achieve this volume of images, every minute of the day’s shoot needs to be managed. Work it out:
- 8 hours in the studio
- 1.5 hour to get the first model made up and hair styled
- .25 hour to get her into the first gown
- .5 hour to get the first shot just right
- 1 hour for lunch
The first shot of the day always takes some time to double check that every aspect of it is right, adjusting how the lighting will be. This is the bench mark for all of the shots to be done during the day.
With the volume of gowns to be shot in a day, I advised the client about the production and the number of models and team members required to fulfill his expectations. In this case, we needed to use three models. This would mean I could shoot them in rotation, shooting one model whilst one is being tweaked in hair and make-up and the third is getting changed into her next gown. There are very often laced up gowns that can take 10 to 20 minutes to lace them up perfectly. They need to be perfect for the back shots.
This leaves approximately three hours of actual model on the set time, so I need to shoot eight gowns every hour or I won’t get the project completed. With all of the in-between things, like loading images, checking them, etc, on average I’m shooting each gown for 7 to 10 minutes. I can’t afford to take any longer or lose any time with computer crashes or other technical issues that are my responsibility. These just cannot occur, so every tiny little detail of pre-production and production must be perfect.
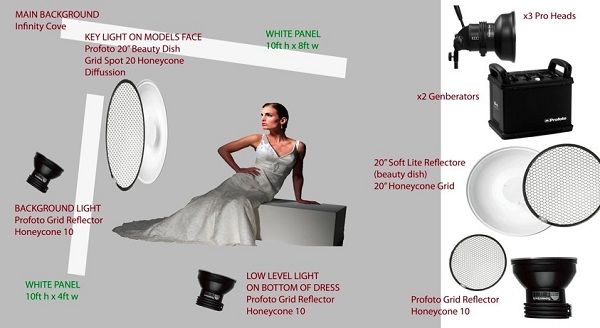
Lighting
It’s not often that I use more than 1 or 2 heads when I’m shooting, but the set for this shoot was designed around making some interesting shapes and shadows. That meant I needed to have a few extra lights to make the images work.
The main key light on my model was suspended on a large boom arm, a Profoto pro head with a 20-inch beauty dish with a honeycomb grid, diffused with a scrim for nice and soft but direct light. It was always pointing directly at my model’s face, close enough to create nice soft falloff/contrast and not be in the frame of the shot. The boom arm meant the light could be moved quickly and easily from shot to shot, depending where I was positioning my model on the set.
The second light on my model was a grid reflector fitted with a 10 degree honeycomb grid, pointed at the bottom of my model’s skirts. This light compensated for the quick falloff created by the main key light. It was positioned to still keep the falloff from the main light apparent, while illuminating important detail of the gown’s skirts.
The third light was the same as the second but placed off to the left, behind the panel, to illuminate the background and the left-hand side of the panel behind the model. I did have two more lights set up the same as the second light, for when I needed to light up other areas of the set/background, but they were not used for this particular image.
Metering the flash
All the heads were positioned to give me the right amount of coverage and the power was set to give me a reading of f11 at the hottest point where the light was falling.
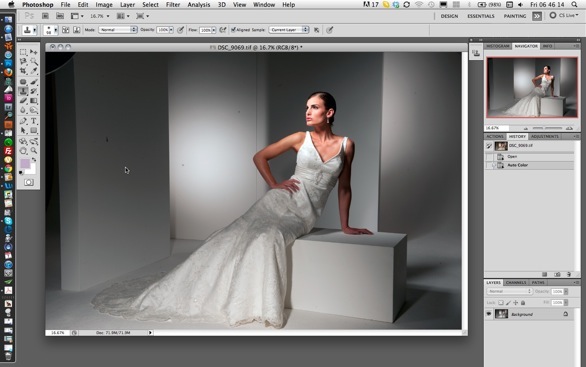
Assessing the raw image
Adjustments I want to make to the image to give the finish that I want:
- Correct overall color cast
- Crop for dynamics and repair over-crop
- Remove lines on panels and spots on the digital chip
- Lift the overall contrast

Correcting the cast
The image has a color cast that didn’t render the color of the gown quite right. To correct this I chose image adjust, auto color, and clicked OK. The cast was corrected perfectly, giving me a neutral color that was just right.
This does not always give you a perfect correction, depending on the biased colors in your shot. Sometimes you have to make some use of some color balance as well as auto color.
Correcting color balance and exposure
If you shoot a color correct card on the first image of each outfit shot, you can do similar corrections for both color and image exposure. To use this method, choose image, adjust, levels. You will see the pipette tools on the bottom of the levels panel. Click on the middle pipette tool, then click the pipette on the mid-gray of the color correct card on your image. This adjusts your image exposure and color to show the mid-tones and color to be the same as the mid gray of the color card, as they should be.
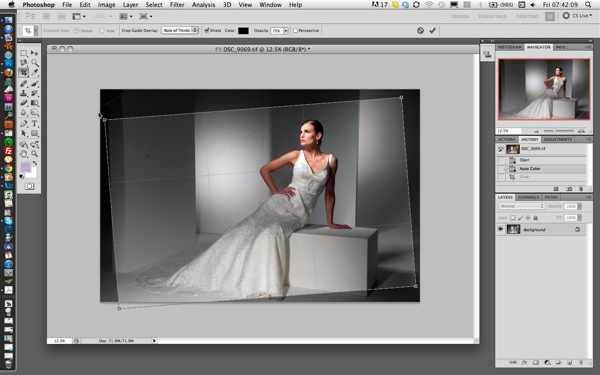
Cropping for dynamics
To add some dynamics to this image, as well as to add some of my own style to the shot, I cropped it out of square, which creates a much stronger punch to the image.
Getting the crop exactly as I wanted it meant I had to over-crop the image slightly at the bottom left. (See diagram image above)
Below is the technique I used in Photoshop to correct this very easily and quickly.
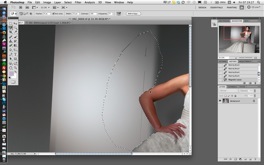
Repairing over-crop
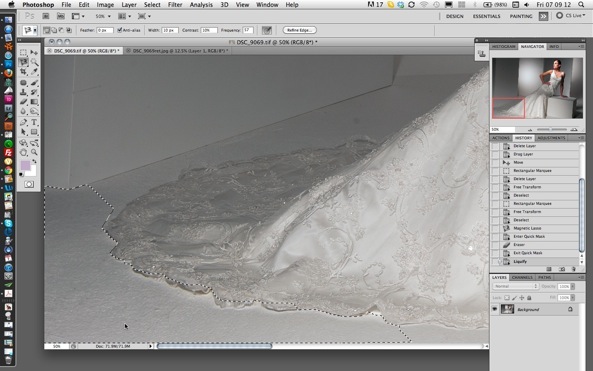
I used liquefy to repair the over-cropped area of the image. Before opening the image in liquefy, I created a mask of the floor area around the bottom edge of the gown. Then I reversed the selection, so as not to alter it when I stretched the floor area. (See the first diagram below)
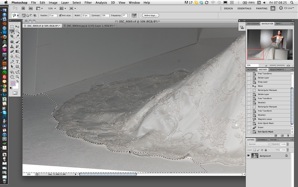
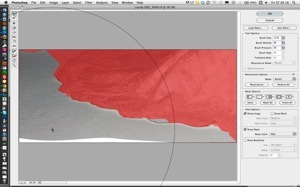
Once the area of the floor was masked off, I clicked filters and chose liquefy. When the image opened in liquefy, the areas masked to be unaffected by stretching appeared red. (See the second diagram above)
I selected a tool size large enough to cover 70 percent of the area to be stretched, and clicked and dragged to stretch the floor out to cover the area of the image left blank after cropping. As you can see, the edges of the bottom of the gown have not been stretched. (See the large diagram image below)
Removing the spots and the unwanted lines on the panels
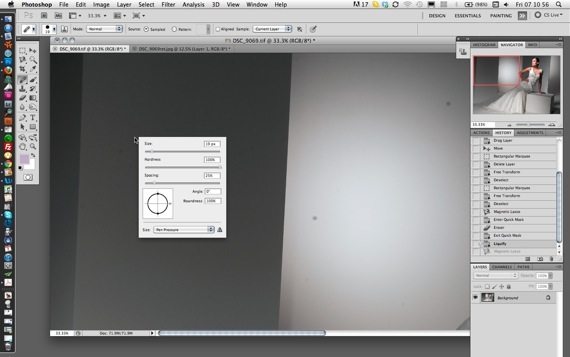
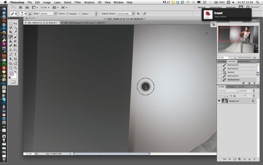
Unfortunately, due to atmospheric dust settling on the chip of my camera, there are a few black/gray spots on parts of the image that need to be removed, as well as the lines of the edges of the painted panels.
To do this I used the healing brush tool set up, as in the diagram image below. Click an area close to the spots, then click on the dust spots and they vanish. (See diagram image bellow)

Removing lines between panels
To remove the lines of the edges of the panels I used the same healing brush tool. To be able to work close to and to protect the model’s arm, I made a selection around her arm using the magnetic select tool to make my masked off areas. (See diagram image above)
Using the healing brush as well as the cloning brush tools to remove the lines, the mask meant I could work close to the model’s arm without damaging her skin.
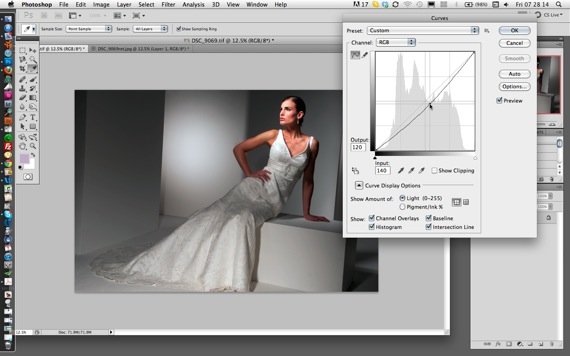
Increasing contrast
To increase the punch of the image I used curves, clicking image adjust, curves. Pulling the center of the histogram down just enough to increase the overall density added some contrast and impact to the image. (See diagram image below)
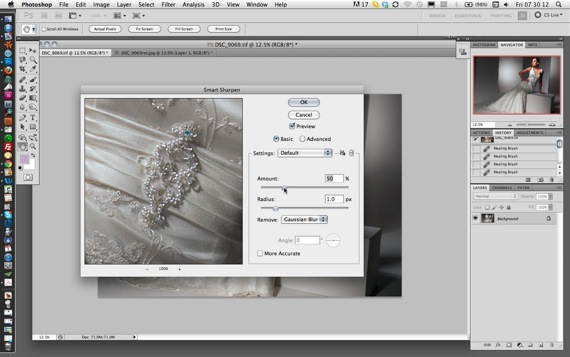
Sharpening with smart sharpen
I find that nearly all digital images need to be sharpened, especially if they are going to be reproduced on a large scale.
I use filter, sharpen, smart sharpen, adding no more than 50 percent sharpening. Any more and the image starts to look obviously sharpened. (See diagram image above)
Saving for press
I always save my master image files as tiffs, retaining the image quality and information and uncompressed. Most print applications such as web offset litho (which is the most commonly used printing process for magazines and newspapers) require high res tiff image files for reproduction of an image. As a tiff file, the image can be reopened and worked on again in Photoshop without any loss of quality. If you work on a compressed jpg and re-compress as a jpg, this reduces the quality and will be noticeable when the image is reproduced. (See diagram image below)

The final image
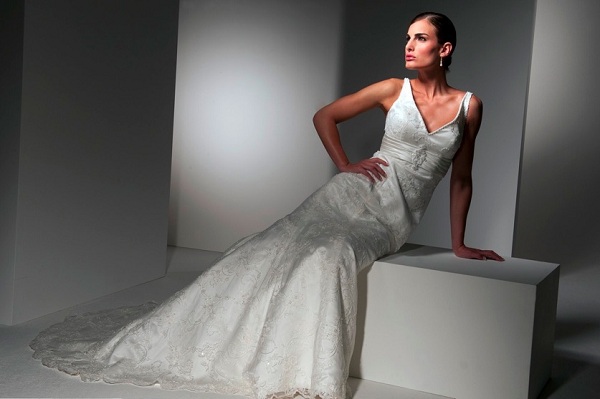
Photographer: Bruce Smith
Bruce Smith
Bruce Smith is a world-class fashion and beauty photographer whose work has appeared around the globe for more than thirty years. He's the author of "Fashion Photography: A Complete Guide to the Tools and Techniques of the Trade" and teaches workshops internationally. His website is www.brucesmithphotographer.com.
Follow Me:


January 15, 2013 at 2:37 pm, Sterling said:
When I do a shoot like this, I shoot tethered so the client(designer) can see the shots as we go on the computer monitor and give onsite approval for an image. We will record or mark the image number too. This speeds up the process considerably for the shoot and afterwards and puts the responsibility for the selection on the client. You have essentially gotten approval for the shots of each dress and don’t have to worry about the client saying later that any shots for any outfit are not up to her satisfaction. Be wary though and don’t hesitate to point out potential issues that you see during the shoot as you will see issues they don’t and vice versa. Its tempting to have the monitor positioned so that the model can see it but this can serve as a distraction for the model. Once a shoot gets well under way, I’ve been able to get shots ok’ed with as little as 2 or 3 shots of a particular pose/outfit.