How to Shoot Fine Art Nudes
In this article I’ll discuss dealing with all the problems when shooting nudes on location, with only available light, reflectors and diffusion screens. There were also lots of challenges dealing with the weather, temperature being a major factor, the right location regarding privacy, etc.
The story line behind this series of images was Naked Fashion, inspired by treasure from the sea washed up on the beach. The treasure was a combination of the beautiful girl with connotations of being a mermaid or exotic beach comber, and the jewelry designs inspired by the sea, all made from real coral and shells.

Photographer: Bruce Smith
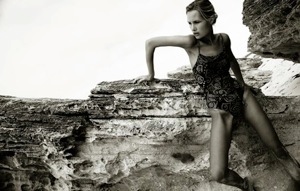
The shot above is one of a series of Naked Fashion Fine Art Nudes I shot during one of my fashion nude photography courses in Turkey.
Casting the right model
Like most, if not all of my shoots, the right model was essential in achieving the right look and feeling in the images. I choose my models very carefully to suit the story. For this shoot I cast Katy McGee, the model in the main image above and featured in the some of the other images in this article. I shot Katy before, and she had experience shooting nudes. Experience is a major factor when you’re making the effort to travel abroad with a team of stylists and hair and makeup artists, as well as all the expense involved to make the trip. It’s very important you come back with images that are stunning as well as right for the client’s needs.
Be very clear about the level of nudity
There are things you need to clarify when casting for such a sensitive genre of photography. When we say nude, how nude? Full nude? Any frontal shots? Implied nude? Topless nude? Nude nude? Not showing anything regarding breasts or private parts? etc. When casting for this project I made it very clear that the images needed the model to be fully nude. This meant for the image to work the model would not always be able to cover or hide parts of her body, but there were not going to be any explicit shots. A model felling uncomfortable on the shoot because he or she was not informed of the level of nudity required would ruin the feeling and the look of freedom required in the images. So make sure when you’re casting or talking to a model about a nude shoot that the intended level of nudity is very clear.
The right body for the images
Is the model’s body right for the type of images you want to achieve? A body can look fantastic in pictures or in real life, but when photographed, especially nude, there are some very obvious difficulties to overcome depending on angles, amounts of body fat, level of muscle tone, etc. Bodies come in all sizes and shapes, from curvy to slim, from soft untoned to toned or very toned and athletic.
My intention
My intention in this shoot was to appeal to both woman and men as fashion fine art images, without an intention to titillate or create arousal. This has to be kept in mind at every level while shooting, so as to keep the shoot and the finished images as they were intended to be. Even the fine art nude can be misconstrued as pornography by some narrow minded people. I have a policy for my fine art images–I don’t shoot what I can’t show to my mother.
The fine line between art nude, glamour and adult images
This is a very sensitive area. The line between these types of images is very fine. You need to be very clear in your mind as to how you wish your images to be perceived, and what the images’ purposes are. To portray a story? What is the story and the intention? To express fantasy? What kind of fantasy? I prefer to depict a sensual story rather than a sexual story. What is the difference? A simple scale: nude images that appeal to a woman; nudes image that appeal to both men and woman; nude images that appeal to just men. For instance, the nude in the fashion image, the nude in the fine art image, the nude in the lad’s mag, and the nude in the adult. They all serve a different purpose.
The location
I chose to book this seven day trip on a coastal yacht (see video) based at Bodrum harbor in Turkey for a couple of reasons. First, a good friend of mine owns the yacht, which is a fantastic floating hotel as well as a means to access great private locations around the coast. We’d spend the week living on board and using the yacht to get to the remote coastal locations around Bodrum. Second, my friend spent a lot of time there exploring and had many images of location options for to shoot that were aesthetically good for the story behind the images as well as private. So, we could shoot undisturbed and have the yacht to use as a floating base wherever we wanted to shoot.

Preparing for a location shoot
For many years I’ve had major shoots for my commercial fashion clients to plan and prepare for. These involve teams of up to 15 people as well as photographic kit, and at times hundreds of garments, cased and shipped across the world by freight weeks before a shooting team sets off. Add in all the dramas that go with traveling to foreign countries around the world, like some very remote locations in places like Alaska, Thailand, Kenya, Morocco and Scotland.
People become like children when they travel. If you’ve ever tried to coordinate a group of people for any kind of event, especially when travel arrangements are a part of it, you’ve experienced some of the problems involved in getting people and kit to a location. There can be nightmares with just the smallest of details that don’t fit into place. You can’t afford anything going wrong, and even when you have crossed all of the T’s and dotted the I’s there is still something going to go wrong. You have to make sure it’s not something that’s going to affect your ability to return from the trip with usable images.
You have to prepare for any photographic job that includes traveling anywhere, not just locations outside the country you live in. Things that can’t be resolved while you’re away are of uttermost importance. Some people even forget their clothes–of course that wouldn’t matter for the team member above.
Make sure you have your team confirmed
Booking and confirming dates with the team members, stylist, muah and models is essential. Have second choices available on the chance someone can’t make the trip for whatever reason. It happens, I know from experience. This is a very good reason to use tried and tested people you can rely on 100 percent.
Booking tickets, coordinating your team and their travel arrangements, especially if people are traveling separately and on different dates, must be handles with care and attention
Responsibility of the photographer? EVERYTHING!
The photographer is the captain of the ship. If it sinks, he or she goes down with it. It’s your responsibility that every shoot you produce goes as smoothly as possible and that all angles are covered, from pre-production to production and post-production.
Planning the shoot
Once everyone arrived at the location, coming from several different places at different times, we familiarized ourselves with our home for the next 7 days, allocating cabins, etc.
When we were settled in, we all sat around the table for a lovely dinner and talked through the plans for the week’s images and how the schedule would run.
On day two we spent a few hours talking through what shooting nudes on location is all about. We did some research into shooting nudes, and looked at various options for shooting and how to approach the techniques with the end results in mind.
Plans can go wrong
During this trip we planned to shoot for 3 days, but the weather, even though forecast to be perfect, was a disaster. That meant many hours sitting out the rain, moored off beaches waiting for breaks in the weather. Luckily for us we managed to get a few good hours of half decent weather over two of the days, and maybe 2 hours on the third day. You can imagine we worked fast and into the evening to ensure achieving the 4 looks I wanted from each day’s shooting.
Where to shoot
When we finished our initial talks and research, we set sail from the Bodrum harbor to recon the coastline for good spots where we could moor up close to good locations that would provide us with great places to shoot for the our first day’s shooting.
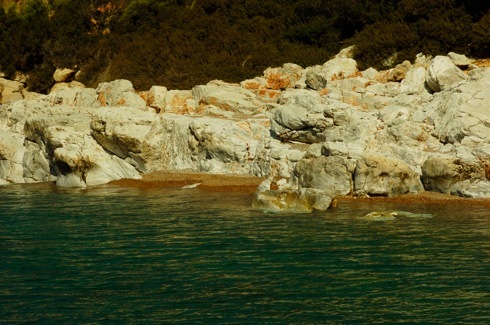
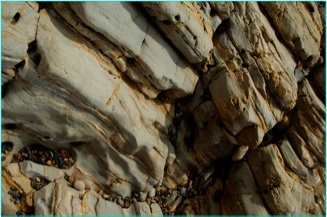
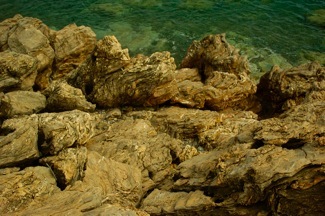
After 20 minutes sailing, we came across rocky beaches with a jetty to moor the yacht. We set off to check out the access to the areas around the beach for shooting. It was perfect. I took lots of reference pictures of the area, searching around for good spots that would suit the images I had in mind, paying special attention to texture and shapes and color (see reference images), even though my finished images were to be black and white.
Look closely at possible shooting areas
There we so many fabulous background possibilities along the 100 yard stretch of the beach. The decision was made that tomorrow we would shoot here, so we fixed the mooring and settled in for the night to be up early and catch best light. Now to check the weather reports for the next day. Fortunately, it looked pretty good, with sunny spells and some cloud cover but NO RAIN.
(See reference images above and below)
There can be hazards you must take into account
It’s very important to make sure of a few things about where you intend to shoot, not just access and privacy, but if there is a tide. What times of the day is high tide? You don’t want to get you and your team stranded, as well as lose your great spot to shoot because you didn’t check the tide times. Where the sun will be at what times of day? This can be checked using a compass, remembering that the sun is lower in the sky early and late in the year. You need to know what footwear people need to have, if the route to your location is dangerous to bare feet or badly shod team members. On this trip, the stylist slipped on a wet rock and badly scratched his legs.
Shooting technique with finished image style in mind
I decided to shoot with soft light and increase the contrast and convert my images to b/w, adding color tints and finishing the images quite dark and moody in postproduction. To achieve this, when shooting I shot all of my images either in the shade or I used diffusion screens to block out the direct sunlight, reflecting some controlled light back in as and when I needed it. (When the sun was out that is.) For most of the time, the sky was overcast, giving a lovely very soft box type of light, which was perfect for what I wanted to achieve. See reference image above from a previous shoot I did in Australia.
Lighting
The main image featured in this article was shot in the shadow created by a wall of rock facing my model’s back, high enough to block any direct sunlight. The sun was still quite low in the sky, creating large shadow areas to shoot in behind the rocks when I took this shot at about 10 am.
For the rest of the images shot on this day I used either the shadow areas or put up diffusion screens to block out any direct sunlight, at times blocking areas behind my model with negative light reflectors to keep the lighting technique for my shoot constant throughout the day
Camera settings and light readings
The image was shot on a Nikon D2H, with a 24 to 70mm Lf2.8 lens, focal length was at 35mm, exposure was f4 at 1600 sec, at 200 ISO. The meter was set on matrix reading, taken from model’s mid-skin tone. The focus point was my model’s ear.
Post-production Photoshop editing and retouching
With the image processed in camera raw, I assess what is needed to be done, apart from the initial exposure and contrast. With an image such as the image below, which is the un-retouched, processed raw file, as you can see, it is softly lit with good detail in the shadows and highlights. This is due to the soft lighting conditions, keeping the brightness range of the scene between high light and shadow, well within the contrast range of the DSLR digital chip, and being not quite as saturated (which is not a concern as I am planning to desaturate and add color tints in post-production).
Below are the various steps I did in Photoshop to make the image as I envisaged when I shot it.
Assessing the raw image
To make adjustments to the image to achieve the final look I want, working on the body and the background separately, I will:
- Duplicate the image so I can create separate layers of the body and the background
- Convert the images to black and white
- Increase the contrast of the rocks
- Keep her body soft but with some texture re-contrast
- Bring the layers together and make a solid color layer to add an overall tint to the image, increasing the brightness of the lighter patterns in the rock

Duplicate the image
I begin by duplicating the image so I can make separate adjustments to both the rocks and the model’s body layers separately. I’ll do any work on the model’s body on the duplicated image and use the first copy image to do the work on the rocks.
Desaturating and increasing the contrast on the rocks
On the rocks/background image I desaturate it by using image, adjust, saturation, and sliding the saturation control to the left to desaturate the colors. (See screen grab – desaturation background layer – below)
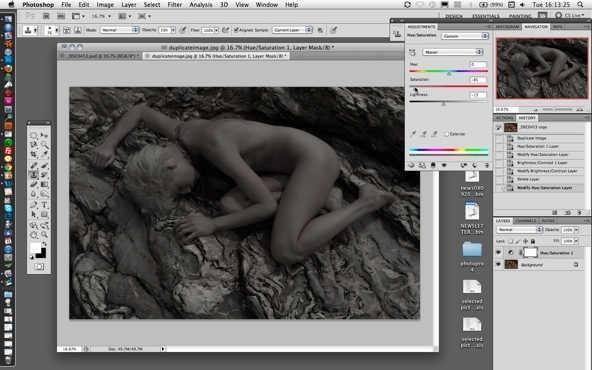
Then I increase the contrast using image adjust, curves, sliding the contrast control until I am happy with the overall contrast of the image. (See screen grab – curves background layer – below)
Lifting the white markings on the rocks
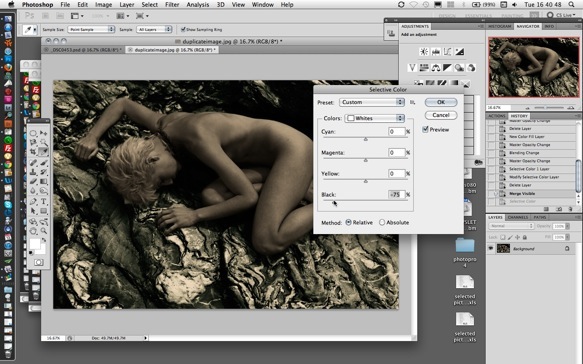
I want the lighter markings on the rocks to really stand out. To bring them out I use image adjust, selective color. In the drop down menu I chose white, then moved the slider on the blacks to the left far enough to lift just the whites of the rocks without blocking them out. I then uses image adjust, curves to further increase the overall contrast, making sure to keep as much detail in the rocks as possible, still keeping the image nice and moody.

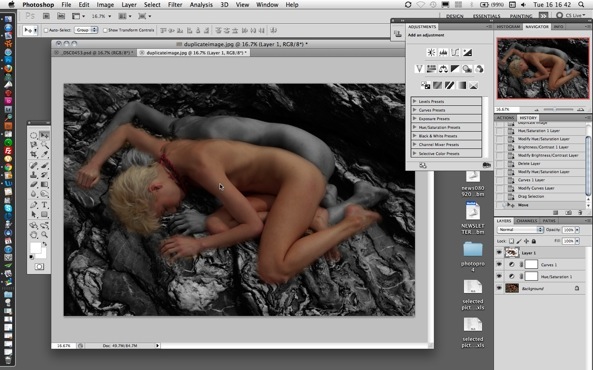
Selecting the model’s body using the magnetic select tool
With the magnetic select tool, I carefully selected around the model, ready to move over onto the background layer I adjusted above. (See screen grab – selecting model’s body – below)

The selection of this image was quite straight forward. There are instructions on how to refine the selection using the mask mode, the eraser and paint brushes in the previous article.
Moving images to create layers
To move the layer for the model, click the move tool (top right on the tools menu), then drag the selected area of the image over onto the background image. This automatically creates a new layer for the model’s body. Make sure the layers are in register. (See screen grab – move selection body layer – bellow)
I’m now ready to work on either layer as bellow.

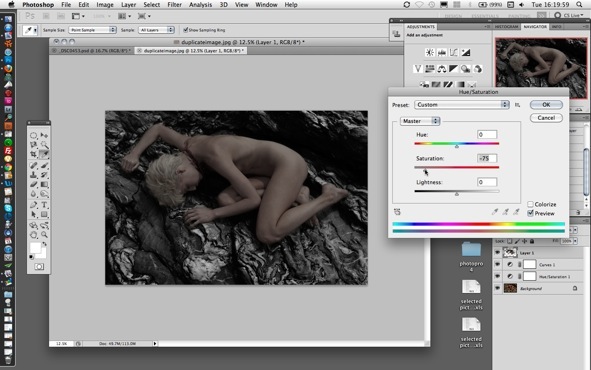
Desaturating the model’s body layer
Follow the desaturation process as above. For this image I left a little color in to create interest and to separate the model and background. (See screen grab – desaturation body layer – below) Select image adjust, hue and saturation, and desaturate by moving the saturation slider to the left.
Adjusting color balance
I wanted to create some interest with colors, to give the image the multi-color toned look of wet process tinting that used to be done with chemical metals in the darkroom processes. (See screen grab – playing with color balance body layer – below) Select image adjust, color balance, and in this case I added some cyan to just my model’s skin color.

Adjusting brightness and contrast of skin tones
(See screen grab – brightness and contrast body layer – below)

Adjusting brightness and contrast of rocks
(See screen grab – brightness and contrast background layer – below)

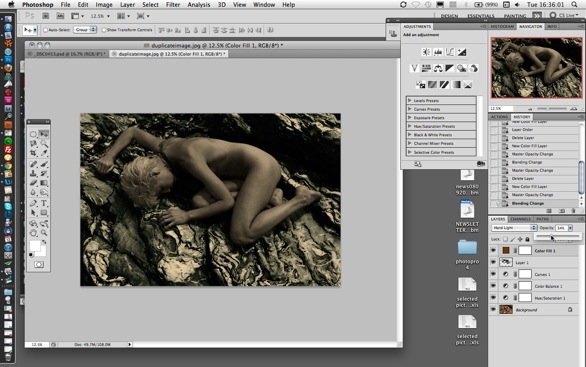
Adding a solid color layer to create overall tint
To add a solid color layer, choose new fill layer, solid color, and click OK. Your image will become a solid color. On the color picker box that opens choose a color from the chart. I chose orange/amber. The slide color covering your image will change to the chosen color. (See screen grab – adding solid color layer – below)

See below how to adjust the opacity and the hard or softness of the solid color layer.
Selecting different effects of solid color layer
When using a solid color layer there are many options to choose from for the softness and hardness and many other options. I use either soft or hard light when putting a color tint on my images, but you can experiment to find out which options you find best for you. The same with the choice of opacity. I chose to reduce the opacity of the solid color layer to around 30 percent. (See screen grab – hard light opacity – below) On the layers panel you will see an opacity box set to 100 percent. Adjust this to the desired opacity. Under the word layers you will see a drop down menu reading NORMAL. Click this and choose the effect you wish to use. I chose hard light for this image.
Final minor adjusting of whites
To finish off the retouching I decided to add a little more impact to the image by lifting the whites just a little, using image adjust, selective color. I chose white and slid the black slider to the left until results were satisfactory. (See screen grab – adjusting whites – below)
Merging the layers and saving the final image as tiff
To merge the layers, choose layers, and merge visible. To save as a tiff, choose Save As, select tiff from the image format menu, and click OK. Choose for IBM, or people viewing the image on PC will not be able to see the image.

Photographer: Bruce Smith
Bruce Smith
Bruce Smith is a world-class fashion and beauty photographer whose work has appeared around the globe for more than thirty years. He's the author of "Fashion Photography: A Complete Guide to the Tools and Techniques of the Trade" and teaches workshops internationally. His website is www.brucesmithphotographer.com.
Follow Me:


March 31, 2018 at 1:10 am, Dimitrina Veselinova said:
I’m ábsolutely agree with Richard. The final image is wasting of time. You start with nice image and produce something disgusting.
March 28, 2018 at 9:35 pm, Jon L. Miller said:
Nice info, although the duped model component was a bit confusing, the final image is nice although I do believe that can be done in LR as well.
March 28, 2018 at 12:31 pm, Nashrambler said:
Thanks for this detailed and clear lesson.
August 24, 2014 at 5:37 pm, bosah vandenberg said:
It is often cleaner to work with an isolated layer that is selectively merged with the main image. Lightroom is simpler but sometimes there is no replacement for a genuine graphic layer.
April 04, 2013 at 11:33 am, Donald J said:
He has to separate the body from the rocks otherwise his model will come out looking Metallic or vice versa for the rocks.
February 14, 2013 at 4:24 pm, Joe said:
Good question Marshall. Everything Bruce is doing here can be done a lot faster in Lightroom, and with a lot less fuss. I don’t see why the need to cut out the body and make it a layer. Unless the skin tone matches the tones in the rock, then LR has plenty of power to do the same or better job with effects than you see here with PS.
February 12, 2013 at 8:38 pm, shutterstorm said:
Your final image at the beginning doesn’t match your final image at the end…?
February 12, 2013 at 2:41 pm, Marshall Bishop said:
I’m curious why you dup’d the selection of the body onto a separate layer. What it just for contrast and skin tone?
February 12, 2013 at 1:27 pm, Richard Barone said:
I think your “raw image” looks better than the final result, but I’m just an artist.
January 27, 2013 at 1:33 am, Curtis Bechdholt said:
Thanks again Bruce, I love your tutorials and look forward to each one.
January 26, 2013 at 6:30 pm, Angel Femme said:
Great article and sharing of your experience. Your tips about the hassle and issues of a job requiring extensive travel is so accurate. In this situation the less number of models to manage is better is my rule. I sometimes source modelling talent locally at the destination and factor in time to develop a working/trust relationship with the model before the shoot. This eliminates a lot of issues.
January 26, 2013 at 9:35 am, Dale Pierce Photography said:
Amazing shot! Love the tutorial.It’s so helpful when a photographer is willing to share his process.thank you. Dale Pierce Photography
January 26, 2013 at 2:13 am, St. Gertrude the Great said:
The rocks – they R so bright it looks like she’s mining 4 Gold
January 25, 2013 at 3:45 pm, Starkey said:
Thanks Bruce; great articles as always. I don’t shoot nudes, but the point about clarity cannot be overstated.
January 25, 2013 at 11:51 am, Scott Vu said:
Great stuff. Thanks for the tips, Bruce.