How to Create Foreground Bokeh In-Camera
Bokeh refers to how a lens renders out-of-focus areas of an image, or more accurately the way the lens renders out-of-focus points of light. Bokeh is most commonly seen in small highlights such as specular reflections and light source areas of an out-of-focus background. This technique aims to bring that visual effect firmly into the foreground.
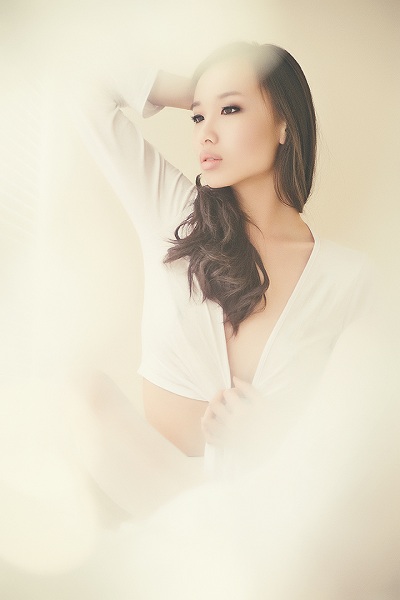
Foreground bokeh

Model: Alex Fia; Photographer: Jake Hicks Photography
Foreground bokeh is achieved by shining light through glassware very close to the lens, thereby creating strong specular highlights which when viewed through a long lens at a low f-number create these blurred circles.
For these particular shots the model was captured with flash and the bokeh was captured with the tungsten light from the modeling bulb from a flash head, hence the longer shutter speeds. This was a personal choice to try and ‘warm up’ the foreground but you could just as easily use flash for both, personally I found the stark white of the flashed foreground bokeh to be too distracting but in theory using colored gels would also resolve this.

Model: Alex Fia; Photographer: Jake Hicks Photography
Take care not to get ‘unwanted’ flare in the lens by using barn-doors or flags, removing lens filters (screw on UV lens protectors etc) will also greatly reduce the chance of unwanted flare.
It is important to note that different lenses create very different results, lens coatings, aperture blade shape, and amount of glass used all play a part in how the final bokeh appear. Varying the lens length and f-stop though are the two key contributors as to how the final bokeh will appear. Experimentation is key.
Shooting info:
- Camera: Cannon EOS 5D Mark II
- Lens: 130mm
- F-Stop: f/5.6
- Shutter Speed: 1.4 sec
- Film Speed: 100
- Light Source: Mixed Tungsten/Flash
Model: Jayey; Photographer: Jake Hicks Photography
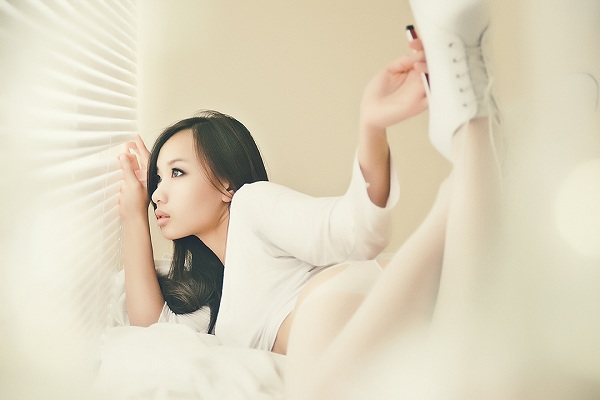
Model: Jayey; Photographer: Jake Hicks Photography

Jake Hicks Photography
Having been a freelance photographer for over six years, I have been fortunate enough to be involved with some very varied and influential clients. They have chosen me to represent their companies image and ideals because my work is always about ensuring a progressive aesthetic to any given campaign, with my results always standing out for the right reasons. View more of my work on my website: www.jakehicksphotography.com.
Follow Me:


August 10, 2016 at 6:13 pm, Matt Mathewes said:
Japanese word for the Quality of the blur.
Mostly used in the film industry.
This can be achieved easier buy using a lens with a smaller aperture like 3.5,3.0 or 2.8.
Also the blades of your aperture in your lens play a big roll in this, a lens of better quality that has more blades will help with this too.This goes back to depth of field and how close the lens is to the subject, and your selective focus. a string of light bulbs in front or behind will help you achieve this and size and shape of said bulb will affect this too. But most definitely experiment to achieve the effect you want. But again it doesn’t have to be a light it can be anything that refracts the light. Most of all TAKE detailed notes so you know exactly what you did. Being able to reproduce your results constantly will help you master the craft.
May 20, 2015 at 12:25 am, Aidil said:
I have always wondered how to achieve this sort of foreground bokeh in-camera. Thank you for the great article. Can I confirm with you that shining light into the lens will create to circle bokeh like the photo with the blonde model and putting glass infront of the lens will create a ‘dirty foreground’ like the photo with the asian model? If so, I have to light the glass elements for the 2nd technique? What are the most common household glass objects I can use? Hope you can help me out.
August 10, 2016 at 1:39 pm, Rakesh Malik said:
It’s easy:
Use a relatively long lens (e.g. 135+ mm — the longer the easier)
Light for a wide aperture, as wide as your lens will go
Frame your subject from reasonably far away
Put something very close to the lens, position it where it looks nice
Light the foreground element to taste
Click
You can make this work with a 200mm f/5.6 as well as with an 85mm T/2.1.
August 10, 2016 at 4:30 pm, Aidil said:
This is awesome advice! Thank you so much 🙂
April 30, 2014 at 8:00 pm, DRFulgham said:
Veryy interesting I will have to try this. Thanks.
October 29, 2013 at 1:02 pm, SDadmin said:
I don’t understand why some people are so judgmental. When I started in the business more than 20 years ago most photographers wouldn’t even share their techniques, so read and learn…
Two thumbs up for this tutorial Jake!
And btw you can get another interesting bokeh by placing a small mirror partially in front of your camera.
August 10, 2016 at 1:31 pm, Rakesh Malik said:
I first learned about a similar concept during a nature photography workshop years ago. It doesn’t have to be a light source in the foreground, or even something all that bright as long as it’s bright enough to get an appropriate exposure on it. I admit that I use this technique a lot more in film than I do in photography, but that’s purely a stylistic thing, it’s a great technique in both media.
Another term for this, the one that the workshop instructor I learned it from used, is “shoot through” because of how he approached it. I don’t know whether that’s a term he came up with or a common one, but that should find references and inspirations as well.
May 25, 2013 at 7:51 pm, Chad Andreo-Photo said:
Where did you get the wire mess background from?
I like the look that it creates.
May 23, 2013 at 2:35 pm, Michael Warren Jr said:
Looks like it would be much easier and save time to add some -negative clarity or a Gaussian blur in PP.
August 10, 2016 at 1:33 pm, Rakesh Malik said:
It usually takes a lot more work to make it look good in Photoshop. I’ve always found it easier to do this sort of thing in camera.
February 05, 2013 at 12:35 pm, Carl Bertossi said:
in next project I will try this !
Thanks for sharing !
February 04, 2013 at 10:17 pm, PerspectiveZ said:
Interesting thought but I think it’s much easier to add this in post than to take time away with model positioning… Background bokeh – all aboard! Foreground stuff – that’s easy to add later.
February 05, 2013 at 1:09 pm, Jake Hicks Photography said:
I agree that maybe it’s easy to add bokeh effects later, I’m hesitant of the quality and the time that it may take you to make it look real though. Don’t get me wrong many people have asked me “what Photoshop filter did you use to create that effect” so in this digital age people just assume that its digital manipulation anyway so why bother shooting ‘in-camera’ to begin with? For me, it’s fun, I enjoy the process of happy accidents and I probably wouldn’t be able to get the same effect later but for those who enjoy the image manipulation more then go for it.
February 12, 2013 at 5:26 pm, kgelner said:
I think it would be very hard to add the analog look these give to an image in Photoshop… these are not perfectly round, and also faintly repeated in different ways depending on the lens. To me it seems like it would be a lot more work to get at all close to the effect digitally than it is just to put a few bits of things up in front of the camera.
February 04, 2013 at 2:33 pm, Issa said:
Are you shooting through the glass? or is it there just to scatter light?
February 05, 2013 at 1:12 pm, Jake Hicks Photography said:
Try different things, I found holding the glasses upside down and shooting though the stalks of the glasses worked well but as for actually shooting through them I found I got too much image distortion.
February 03, 2013 at 12:45 am, Dee Coles said:
interesting concept. where do you place the glass? just off to the side and close to the lens? i assume just experiment with placement or have you found a specific spot to work better? any pics of setup example? good job.
February 05, 2013 at 1:02 pm, Jake Hicks Photography said:
I found those old-fashioned glasses with the patterns cut into the sides work really well (think old sherry glasses) they create a lot of spectral highlights which is what you are after. I have the camera on a tripod and usually holding two glasses in my left hand and firing with my right. Moving the glasses closer to lens if not touching creates the largest bokeh. Hope this helps. I’d love to see any results you produce, you may find a more interesting approach, coloured glasses maybe.
January 31, 2013 at 10:56 pm, The Private Collection said:
Absolutely. For commercials I built a glitter-box, and I’ve got glass wear, glass boxes, all kinds of shimmery stuff. One ad we used a metal staple gun and a grip-clip just in front of a 135mm and pounded a light into it.
January 31, 2013 at 7:40 pm, Beach House Studios said:
are you serious with this …gimme a break Dude.
January 31, 2013 at 7:36 pm, onethurteen said:
Great! I’ll have to try this at least once.
January 31, 2013 at 1:25 pm, Duke Photo said:
so to clarify – i assume the modeling lamp was on a different strobe than the one’s you’re using to light the model?
January 31, 2013 at 3:04 pm, Jake Hicks Photography said:
Correct, the cell (the device that triggers the flash to fire) has been turned off on the light that is lighting the glasses so it’s not firing, its modelling bulb is just on constantly.
One of the issues I had was that I knew I wanted to shoot with a wide aperture to get the bokeh effect but I couldn’t get my Monobloc that was lighting the glasses to a low enough flash power to match the models lighting exposure. This ultimately resulted in no flash and a tungsten foreground light instead.