How to produce a fashion shoot in the desert
The brief for the image featured in this article was to produce a fashion story of eight dresses for a fashion designer based in Los Angeles, California.
The dresses were all flowing chiffon with very saturated color patterns, so the images needed to have a lot of movement in the fabrics shot against a background of the sky and the desert floor.
Like any location shoot there would be a lot of planning and preparation prior to the work. There were also several things to take into account beyond just getting there, like dealing with the elements of harsh sunlight, wind, and dust storms, all of which actually made it a very tough shoot to produce.
Achieving the client’s objective
As in previous articles regarding achieving the client’s objectives, it’s very important that the images you produce for your client meet their needs.
For this project my client’s most important factors were to have images that could be used for submission as magazine editorials and her own press adds, so they had to appeal to fashion magazine editors or they would not get published. The type of magazines the images would be submitted to need suite the ideals and lifestyle of the potential buyers of my client’s clothes. To ensure this, I wanted to shoot the dresses with a very edgy/editorial feel to them, unlike images for a catalog/look-book, where every detail and the cut, the color, the fall of the outfit etc. are needed to be seen clearly in the image.
The editorial image is about a combination of reflecting trend and creativity. In easy terms, they are images that tell a story, exciting and interesting, but also show the feel of the outfits that the client envisaged when designing them. To bring the client’s vision into this shoot I wanted to emphasize the colors and the flowing softness of the chiffon dresses by shooting them against the vibrant blue of the desert sky and the starkness of the desert floor, using the natural wind to create movement in the flowing fabrics. This was my interpretation of achieving my client’s needs. It sounds very easy, but how do you guarantee you’re going to achieve all of this?
Pre-production
Now that I knew my client’s needs, and I had in my mind how the images will look, I had to put together a production plan to ensure I come back with fabulous images that will work for my client’s objective. There were a few more questions I need the answers to. How many outfits to produce during the day? What type of model would suit the client’s image and the style of the dresses? How did she envisage the look for hair and makeup? Would the designer be styling the outfits with the accessories such as jewelry and shoes, etc? All of the little things that can add to a fashion shoot.
Location
As I had not produced a shoot of this kind in Los Angeles, I had to ask around for advice as to what would be a good location. As it happened the hair and makeup artist I had chosen, Sharon Hawkey, suggested that the best place would be at El Mirage Lake. It’s a dry lake bed in the Mojave Desert of San Bernardino County, California, about 2 hours or so drive from Los Angeles. When I saw some of her outtake pictures I decided it would be perfect. Sharon had worked on a shot there only a few weeks earlier and new exactly where we should go, as well as a lot of information regarding what to expect when we got there.
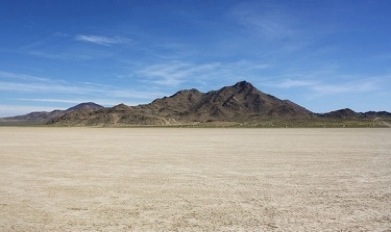
Normally I would take a trip out to the suggested location to do a recon, but Sharon’s a very experienced makeup artist that has worked on many high profile productions, as well as working with me for many years on my shoots in LA. I could trust her judgment implicitly. It was decided. El Mirage it would be.
Selecting the right models
The client would be styling the shoot, and I had my makeup and hair styling sorted out with Sharon on board. All I had to find was two models that would fit the brief. Because our objective for the images was for editorials in magazines we needed to book editorial models and not commercial ones. How do you tell the difference?
The commercial model
Take a look inside mail order catalogs or magazines targeted at the everyday middle of the road family. The models featured are chosen for their look to identify with the reader–models that represent the target market for the magazine or catalog. Their look is more average and closer to the real world, less extreme. They average in height around 5’7” and up, with the type of figure varying according to the target market or product. A model for lingerie/underwear will be a little curvier than a swimwear model; a fashion model will be taller and slimmer than a lingerie model etc. There is no strict line between them, they are chosen to suit the markets so the market identifies with their look.
The editorial model
Again take a look at the variety of magazines that appeal to more extreme target markets–life styles that can be deemed as more edgy and unusual. The models featured will be less conventional, with looks that can be unusual, less safe, in common terms–an editorial look. The editorial model’s work is mainly being photographed for editorial features in fashion magazines. Most fashion magazines are always looking for new looks that reflect fashion on the street. A classic case to look at is Twiggy from the 1960s, who was probably one of the first unusual looking editorial models, with an extreme look. Prior to Twiggy, models were more like the normal woman, very beautiful, tall and slim, but not so extreme. Again there is no fine line distinction, just a new or different look for fashion that’s in the now.
The choice of model for this project was more towards the editorial looking. I looked at models from some of the top model agencies in LA and short listed to about half a dozen to present to the client as potential choices for the shoot. I had a preference for Taja Plecas, who also appealed to my client, so we booked her. I will go into booking models and the usage for fashion images in another article.
Basic needs of your team
The team needed to be briefed regarding the shoot and regarding the problems and needs for protection from the elements, especially the dry heat and very dangerous sunburn risk. Clothing had to be worn for both comfort and the practicality of shooting in the desert–a hat with a wide brim to keep out the sun, sunglasses with high UV protection and of course full sun block cream and lip balm.
There would be no facilities out there like a toilet, no shade, no protection from the wind, no changing facility, no food or water, all of the things that people need in the desert and to survive a long day’s shoot. All of the above had to be taken with us–from a toilet tent, to plenty of bottled water and food to keep everyone going throughout the day.
Camera kit

- The main camera body was the Nikon D3 and as backups a D2H and a D700. I wanted to shoot extremely wide angle, so the 17 to 55 would be my perfect choice on the D3 body with the full frame CMOS sensor chip.
- Nikon Lenses, a 17 to 55 f2.8, and a 24 to 70 f2.8–along with my 70 to 200 f2.8, which always seems to stay in my camera bag.
- A Polarizing Filter to help saturate the colors of the fabrics, darken the sky, whiten the clouds, enhance sheen on the model’s skin and to generally help the overall contrast of the images.
- Professional Flash Cards, enough to shoot the whole collection in case of computer crash,
- Very Fast Card Reader
- Spare Camera Batteries
- A Dust Proof Camera Cover to protect my camera from the flying dust.

Lighting kit
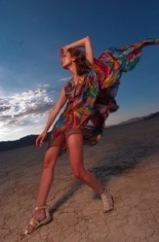
As we were shooting many miles away from any electricity, we had to take a battery powered flash kit. I decided on my Elinchrom Ranger RX location lighting kit with several fully charged spare battery packs, 3 spare heads, a 77cm beauty dish with a gold deflector, a radio sync, a heavy duty stand, couple of sand bags and a metal chain to hang the pack off the stand for added weight to make sure the lighting stand didn’t fall over in the heavy wind. As you can see in the outtake image above, my crew was also keeping tight hold of the stand as added protection from the wind.

Even looking at the outtake image, you don’t get a real impression of how bad it actually was to shoot at El Mirage.
The wind beat you with sand and grit and seriously threatened to blow over the lighting set up. You can see my first assistant holding the beauty dish to stop it from toppling over, as well as turning it as I shot to keep the flash head pointing just at the right angle so my model’s face was lit perfectly for every shot while she moved to my direction.
Lighting the shot
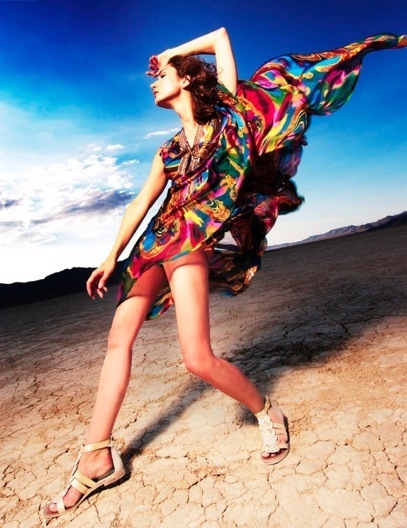
The lighting effect I wanted to achieve for this shoot was high in contrast on my model, with a saturated rich dramatic sky as my background. To achieve this I used one flash head with a 77cm beauty dish, with a gold deflector attached to warm up the light, and no diffuser over the beauty dish to create a sharper more specular lighting effect.

The flash was set up high up just on my left side and about 10 feet away from my model, to ensure no falloff of light intensity from my model’s head to her toes, also to add an extra crispy edge to the lighting.
Metering the ambient light and the flash power output
With my ISO set at 200, the ambient light reading on my model with the meter pointing towards my camera position was f/8 at 125th sec. Because I was shooting with a polarizing filter attached to my lens, (which cuts out 2 stops of light), my equivalent correct exposure would be f/4 at 125th sec. So I set my camera aperture to 2 stops under this reading, f/8 at 125th sec, to under expose the ambient light by 2 f-stops. This meant I needed to set my flash output power to give me a flash meter reading of f/16 taken from my model’s position with the meter pointing towards the flash and the camera position.
The polarizing filter serves two purposes in situations like this, one, as said, to enhance and saturate the colors of the outfit, to darken the sky, etc. The second is to help under exposure of the ambient light when using flash shooting with a 35mm DSLR that will only flash sync at 125th sec when using an off camera studio flash kit, radio flash firing or cable syncing.
It’s important to have your shutter set at a max speed of 125th sec when syncing camera shutter with studio flash, to be safe from losing a strip down the edge of your image when shooting with flash at shutter speeds faster than 125th sec.
As the sun was going down I kept the flash output and aperture set the same and adjusted my shutter speed to slower speeds to allow for the decreasing ambient light. I think it was down to about a 30th sec by the time the sun was about to set.
If you’re shooting with a leaf shutter you can sync up to a 500th sec, making under exposing the ambient light and syncing to flash less of a challenge.
The result can be seen the images bellow, shot at f/8 at 125th sec, the middle image is how it looked at the same settings without the flash firing and the last image is shot at the correct reading for the ambient light with no flash.

More to an image than technique, pixels and Photoshop
Creating an amazing image is not just about your camera’s number of pixels, lighting or type of lighting kit or fancy techniques in Photoshop. A great image must have more to it in order to make people look longer and sigh, “Wow, that image is fantastic.” When someone’s first impression is, “My God, how sharp the shot is, look at the at the definition, it’s incredible,” that’s nice to hear if you’re a sharpness, detail and technique freak, but in my mind if this is what they see in the image the image is lacking in energy, feeling, movement and emotion. These are the major elements I strive to get into every image I shoot. Without real energy, movement and emotion in your original image there are no lighting or Photoshop techniques that can put it in. It’s about having an idea in your mind and portraying it to your audience through your communication, your directing and your being in full control of your shoot.
A few more things about this project
It just so happened that one of our models lived on route to the location, so we used this as stop off to get both models made up and to have a cup of coffee or four to wake everyone up.
We took a large canopy with us to use as a base for the team, to set up tables and computer kit, and shelter from the mid day blistering heat. The wind was so strong we had to tie the canopy and its legs to the wheels and roof racks of our cars, using a three vehicle barricade to block the wind and to stop the whole thing from flying off across the desert.
The makeup was being ruined by the wind, causing the models eyes to water along with her being attacked by the harsh sun. We could only shoot around 10 frames before she had to have her makeup repaired as well as to take a break from the heat.
Assessing your image for post-production/retouching
Adjustments to the image to give the finish that I want:
- Increase the overall contrast and saturation
- Clean up spots from dust on the digital chip
- Size images for my clients various usages, i.e. 72 dpi for web, 300 dpi for press
Typical worklow:
- Increase contrast using curves.
- Increase the saturation using hue and saturation
- Crop for dynamics to fit the magazine page proportions
- Remove the few dust spots
- Size for publication
- Sharpen using smart sharpen
- Save as a PDF ready for print
The finished image
Photographer: Bruce Smith
Bruce Smith
Bruce Smith is a world-class fashion and beauty photographer whose work has appeared around the globe for more than thirty years. He's the author of "Fashion Photography: A Complete Guide to the Tools and Techniques of the Trade" and teaches workshops internationally. His website is www.brucesmithphotographer.com.
Follow Me:


August 14, 2023 at 11:35 pm, Bruce Smith said:
Thank you all for your subjective observations.
Maybe you guys could add a link to your own images along with the techniques used to achieve your images.
Regards
Bruce Smith
April 22, 2013 at 2:46 pm, Adonigh said:
Greatly informative article however your finale product was not appealing. Maybe to the untrained eye however not mine. no need to mentioned what has already been said about the exposure , and angle. but one thing you Might want to keep in mind; about using different lenses, some lenses will distort the physique of your subject. Hence why the “feet look HUGE” as Lola mentioned below. there are certain focal lengths you want to stay away from using a wide angle lens while shooting people. Even if you where to be satisfied with the overall composition of this image you should probably invest in using a professional Retoucher to edit your final images. Ive seen better images produced from photographers with less equipment and crew than that which you have, just saying if i had all that equipment id make sure everything is up to par with the level of professionalism you are trying to achieve.
April 22, 2013 at 2:48 pm, Adonigh said:
But Good Job If no one mentioned that, take the critique and apply it.
February 28, 2013 at 9:34 pm, Andy Wanderlust said:
I’m rarely one to give harsh criticism but that final image really is awful. Not much to add that hasn’t been said before, but gosh it’s worth repeating. As underexposed as the final shot SOOC is, it’s far better than the final edited hot mess… oversaturated, truly bad angle (it gave me vertigo while at the same time making me wonder what model wears shoes in a size 17 wide) The super overexposed cloud just looks like… well, every overexposed cloud ever taken with a point and shoot. Could the sky be MORE blue? Could the shadows be more deep and impenetrable on her dress/smock/Idontknowwhatitisbecauseitsblowingaroundwaytoomuch? For a fashion shoot I would tend to focus on the fashion, not the dark. I think it would have been better to go with the saturation the polarizing filter would give you naturally, resist the urge to crank it to 11 in Photoshop. To catch the dynamic range and pick up some detail in the shadows while not blowing the cloud to smithereens you could have bracketed across a few exposures and then selectively composited it together, but OMG please don’t HDR it!
August 14, 2023 at 11:59 pm, Bruce Smith said:
If we all shot images with camera club rules there would be no room for creative expression left I photography. Rules are made to be broken as much as followed to the T.
February 28, 2013 at 2:35 pm, Lola said:
People all have opinions about what they like and don’t like, I personally think the image looks fine for editorial work. The thing that really bothers me is the angle and that is only because her feet look HUGE!!! Like giants feet, it is very unflattering.
February 28, 2013 at 1:41 am, Sarino said:
I think the final image looks like crap. The contrast is so high it goes from washed out to pitch black. And where there is color it’s so over saturated it doesn’t look real. Doesn’t show the dress well at all. And the angle on the model is so unnatural, who looks like that in real life? I agree with Timothy, the one with natural light looks the best The flash shot on the left of the trio isn’t bad, far better than the final image, but the angle is awful, the angle on the one with no flash is much better. I think if Bruce had turned on the flash on that (middle) shot it would have been a really good one. And reading over this article makes me wonder how much Bruce knows about his equpment. I checked it out because I’m in Las Vegas and was thinking of getting some ideas for future shoots in the desert. I’m no pro, but I do dabble in photography myself, and I own a D700. The D700’s sync speed is 1/250, with the Nikon flash I use it’ll sync at 1/8000 and the shots come out perfect, don’t know how they do it, but it works! Nikon makes killer flash units! I also know, from the F4 I use to own, that Nikon’s have verticle travel shutters and if the shutter speed is too fast you get a horizontal black edge, which I think is on the bottom of the frame, not the sides. Now I know why most of the photographers that have done TFCD shoots of me have never given me the work, they probably don’t know what they are doing and messed them all up!
August 14, 2023 at 11:57 pm, Bruce Smith said:
It is because of subjective observations like this that I decided not to write any more FREE technical posts.
February 27, 2013 at 9:17 am, Garage Photography said:
Great article. Well written and informative, including camera and flash settings. Well done.
February 26, 2013 at 6:41 pm, Michael Joseph Edmonds said:
Great read! Professional advice… well and intelligently written… is invaluable… and rare!
😉
February 26, 2013 at 12:34 pm, Timothy said:
I think the one on the right with no flash, just natural light, looks the best. Sometimes less is more. Why go all the way out to the desert and then not be able to see much of it in the final photos?