Photography Tips: How to Bounce Light
The core of this lighting technique is diffused lighting and it’s most commonly seen outside on very overcast days. Diffused lighting is seen as the softest form of light in photography, with its characteristics creating very few shadows or spectral highlights. Essentially these traits are created by having a larger light source than the subject. On a cloudy day, sunlight scatters in the clouds and completely envelops the subject, giving the look of very flat lighting which can be very flattering, as the light will not cast any unattractive shadows. Sometimes in a studio you want to avoid using very hard light. If you want to photograph models in the studio with a similar diffused lighting style, your light source needs to be very large, at least larger than the model. This is not only very difficult to transport but can also be very expensive.
Basic Bounced Light

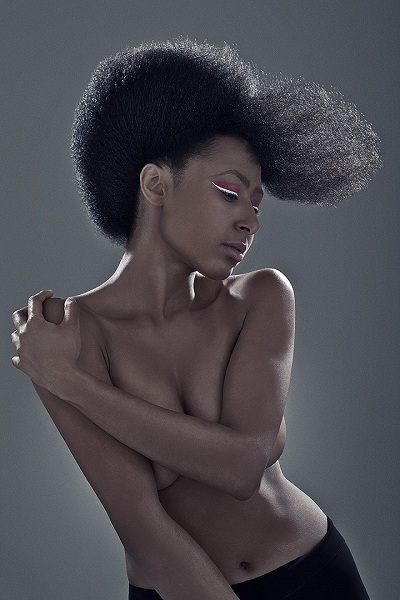
Model: Natasha Kalashnikova; Photographer: Jake Hicks Photography
So to create this incredibly soft and flattering lighting without spending a fortune or being tied to a single location, there is a very simple alternative. The image shown here uses two lights but could easily have a very similar look and feel with just one. The trick is to utilize your environment. The key light here is actually pointing in the opposite direction and bouncing off the opposite wall, therefore making the wall the light source, which is clearly quite large. As long as your strobe has the power and you have the room, the further back you get from the wall the larger the bounce and in turn the larger the light source and the softer the light. Also of note is that I usually shoot bare bulb strobes with this technique. This gives the maximum spread of light, but a wide reflector dish would also do just as well.
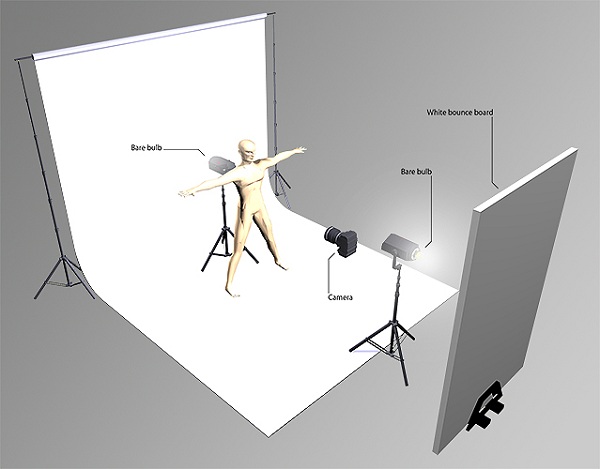
With a little practice this can be a formidable technique to wield in a pinch, as it can be achieved with a single flash-gun pointing behind you, and a white wall, making it a great way of producing striking and flattering results when you have very little equipment to hand.
A key point to note however when experimenting with this is that you need to be very wary of the color and tone of the surrounding area. Remember, bouncing light off any surface will also transfer the color along with it. A lot of the time a slightly off-white wall can be corrected with white balancing but stronger colors may not be so easily fixed.
Shooting Info:
- Camera: Nikon D600
- Lens: 85mm
- F-Stop: F2.5
- Shutter Speed: 1/160 Sec
- Film Speed: 100
- Light Source: Flash
Advanced Bounced Light
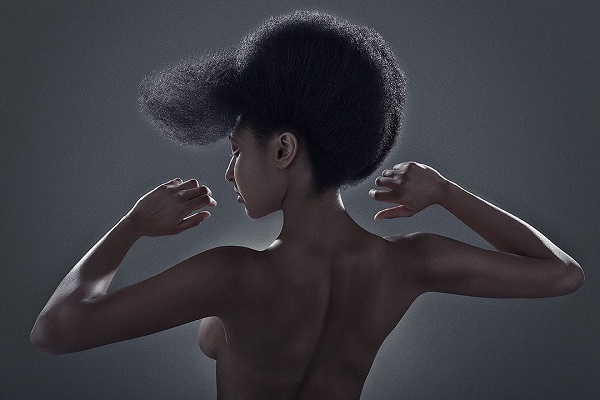
The images shown here were shot without using any lighting equipment from the front, that is to say that all the light is coming from behind the model and pointed towards the camera. The light shown on the model is actually being bounced from two very large “bounce boards” from camera left and camera right. I refer to them as bounce boards over reflectors to distinguish that they are “diffuse reflectors.” They are usually painted matte white and therefore are far more light scattering than a reflector, which is normally thought of as shiny silver or gold and mostly just redirects the hard light, not softens it.
Model: Samar Khoury; Photographer: Jake Hicks Photography
In this image my actual key light is made up of two heads, each with a straight dish and honeycomb grid attachment. This would commonly produce some of the hardest shadows in studio lighting, due to its small source and effective channeling of the light. This type of light is quite often used behind models and in portraits to give a crisp highlight to hair and is unsurprisingly referred to as a “hair-light.” Like these images illustrate, that light picks up the edges of the body and hair and creates a strong line on any contour, giving the subject a very sculpted look. After the light has done its sculpting with its very hard light, it then spreads and travels on towards the large bounce boards opposite. As the light falls onto these large white areas it scatters and now becomes the light source in relation to the unlit front of the model. The light source is now larger than the model herself, resulting in the light appearing to be incredibly soft and diffuse, leaving a very flattering light enveloping the body evenly.
Model: Samar Khoury; Photographer: Jake Hicks Photography
With this lighting technique it can be tricky to balance both front and back exposures, you need to watch you don’t lose edge detail but also expose the front accurately. The reason for this is that the power of all light diminishes over distance, so the light is at its most powerful when passing the back of the model and greatly diminished once it has passed by and then bounced back into the front. Bearing that in mind you also need to be producing some considerable watts if you want to use smaller apertures.
Remember that those bounce boards are effectively acting as light sources. They can be moved closer to the model to increase the power of light falling on the front or be moved further away to darken the effective light.
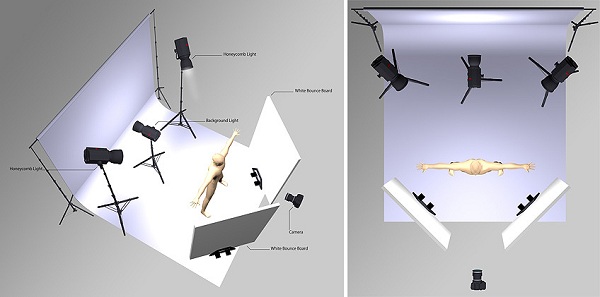
There are also a couple of fine-tuning points to bear in mind when setting up this shot. First and foremost is the constant threat of aggressive flare in the lens from the two high powered lights pointed directly towards the camera. There are a few simple remedies to this, the most obvious being a large lens hood to flag the light. But the other is to shoot with a longer lens and position yourself back behind the bounce boards and use them as giant flags to cut the light from going into the lens. The other consideration is how to angle the boards in relation to the lights. I have mine set squarely in line with the light opposite it, crisscrossing the lights at right angles in the middle. This ensures the maximum use of the light hitting it without any spilling off at awkward angles resulting in a dimmer light being bounced back in.
Shooting Info:
- Camera: Canon EOS 5D Mark II
- Lens: 70mm
- F-Stop: F10
- Shutter Speed: 1/200 Sec
- Film Speed: 100
- Light Source: Flash
Jake Hicks Photography
Having been a freelance photographer for over six years, I have been fortunate enough to be involved with some very varied and influential clients. They have chosen me to represent their companies image and ideals because my work is always about ensuring a progressive aesthetic to any given campaign, with my results always standing out for the right reasons. View more of my work on my website: www.jakehicksphotography.com.
Follow Me:


February 12, 2014 at 6:31 pm, Jason Lupas said:
Brilliant article , it was very informative .
April 02, 2013 at 10:43 am, frankberaud.com said:
Very interesting indeed. I especially like the set-up for the advanced bounced light. Could you share the f value you had for the incoming light onthe back of the model?
March 18, 2013 at 4:26 pm, T-elle said:
I have these boards but I’m curious..what do you use to stand them up?
Also, I have not been able to find boards that are black on one side – just the silver and white one at Home Depot. Thanks! Seattle Photographer
March 17, 2013 at 3:19 pm, Ernest said:
Enjoyed the article, thank you kindly 🙂
March 13, 2013 at 11:25 pm, Jeremy DuBrul said:
NICE write up and illustrations. FomeCor (they do go by other trade names), which one would be making their V-Flats from, can be found at Blick Art Supply (nation wide) for sure. Their pricing at the store is rather good (about $40 a sheet here in the Chicago area, either black or white) and they should be stocking 4×8′. More remote areas, you may have some difficulty unfortunately, but there is MORE than just ONE way to solve the same problem.
March 13, 2013 at 12:06 pm, Timothy said:
Great refresher. Maybe should have mentioned that “v-flats” should really be standard equipment in any studio, though. V-flats are when you attach two of these huge boards together with gaff tape (or similar method), so they can open and close and can stand up on their own. Also, one side is usually black, to kill reflected light if you want. There’s no reason not to have at least one on hand.