8 Ways to Flatter Women Using One Light
I often work outdoors with just the sun as my one light source or in very tight spaces, with little room for more than the model, me, the makeup artist, and one strobe. There are many wonderful ways you can use one light source to flatter the women you photograph, and it’s nice to have a handful of go-to lighting scenarios that are easy to execute, consistently reliable, and flattering to the majority of women. I have included eight looks that are just that, which I think are particularly useful for boudoir photography.
Mix it up and make it your own
The following scenarios are techniques that you can borrow to inspire your own work. Think of them like recipes and trust your inner artist to add, subtract, or tweak them to your taste.
Within each of these looks are many alternatives. With just this single light source, it’s possible to create a wide variety of looks, even with just slight adjustments. You can vary the height of the light, the angle of light, the distance of light to subject, the distance of camera to subject, the position of camera in relation to the subject, and your choice of accessories— not to mention changing your exposure settings, background color, her wardrobe color, and so on. Experiment with each lighting scenario, have a good time with it, and make it your own. Take it a step further and add your own creativity. You can also use these setups as a base and then start adding on additional lights if you like, such as a hair light, a second fill light, or a light pointed at the backdrop. But for me, simple is usually the way to go.
A couple of small but important technical details: All setups with strobes were at the lowest power, 2.3—about 30W. In most cases, a higher- or lower-wattage strobe could produce a very similar look, as would continuous lights. (Continuous lights are different from strobes in that they stay on all the time. For simplicity’s sake, I don’t cover those in this book, but you could easily do any of these lighting setups with continuous lights instead of a strobe.) Because describing it is nothing like seeing it, I’ve included demos at christameola.com/artofboudoir.
What’s the story you want to tell?
When creating a lighting setup for a shot, I ask the following questions to help guide my decisions. The first is one I’ve emphasized previously: What is the story I want to convey and what is my focus? Is it her facial expression, the curves of her body, her clothes, the setting? Which lighting setup will help me communicate that and pinpoint the focus there? And most important: Is it flattering to the subject? Do we want to enhance or de-emphasize certain body parts?
Keep these questions in mind as you read through the following lighting scenarios and consider how you would use each one with the women you would like to photograph.
1. Gorgeous backlighting
Shooting a subject backlit is one of my favorite techniques and is an extremely easy setup. Whether using the sun as the main source or an artificial light, this scenario is great for flattering women of all body types and for creating a striking image with a feeling of luminosity and joyfulness. When shooting indoors and only with natural light, I place my subject in front of a window (the main light source), and then make a few different choices depending on the following:
If my model is modest, I like to try a few shots placing her behind sheer fabric or sheer curtains, so she feels and appears less exposed, as we discussed in the “Styling” chapter of the book.
Then I decide whether or not to add one or two large white reflectors just to the side and in front of her to act as fill light, depending on my focus and the amount of light in the room. For Figure 1, I did not use a reflector since the available light in the room was enough and what I’m focusing on here is her form, not necessarily her face or catch lights in her eyes.

Figure 1. By overexposing this image, we blow out the outer edge of this young woman’s belly, back, bum, arms, and upper thighs, giving her an even slimmer appearance.
50mm lens, ISO 100, f/2.2, 50 sec.
You can also experiment with the model in front of the sheers (Figure 2). Here, since we see her face and the room was fairly dark, I did use a reflector just to the side and front of her to bounce light back onto her body and face (Figure 2).

Figure 2. This behind-the-scenes shot shows the placement of my two reflectors used together and how close they are to the model.
Finally, I consider my model’s modesty level as well as what she loves about her body and adjust my exposure accordingly. By varying exposure, we can control how much of the model’s body we see or don’t see. If your subject is modest or unsure about how much nudity is too much for her, you can give her a few options by capturing this shot at different exposure levels. You can see nothing but a silhouette by underexposing, her entire body by overexposing, and every level in between.
There are two additional benefits to overexposing. First, you can blow out unattractive or distracting backgrounds. Second, you can give her a slimmer appearance if she so desires by blowing out the edges of her body, as in Figure 1, so its outer edge cannot be detected.
Equipment:
- 42 x 72-inch and 42 x 42-inch white reflectors (Figure 1)
- Multiboom light stand (Figure 1)
2. Sultry, low-contrast lighting
For this setup, I wanted a subtle look and sensual mood, so I went for a low-contrast, low-light effect, something seductive that will flatter the woman who wishes to de-emphasize certain body parts, such as her stomach, arms, waist, chin, or even legs, depending on how you position her (Figure 3).

Figure 3. Whether your subject is standing or sitting makes a significant difference in how much light hits her legs. Here. I have her slightly seated to push her legs forward toward the light, since she loves her legs.
50mm lens, ISO 200, f/2. 160 sec.
For this look, I placed a single strobe fitted with a medium softbox overhead and a large white reflector about a foot away from the model and slightly to the side (Figure 4). The reflector is just enough to cast a soft, even light across her whole body. Set your camera to underexpose by a couple stops, and you’ve got a beautiful shot with sensual mystique.

Figure 4. You can see just how close the reflector and light are to the subject.
You can experiment with this setup by adjusting her proximity to the light (Figure 5). Inching your subject forward or back a few inches dramatically affects the result, and the reflector adds just a bit more information to evenly light her body so you don’t get a disconnect. Her tummy and back of arms are hidden, disappearing into the shadow. You can further experiment if you’d like to see more of your model’s body outline by choosing a lighter backdrop, lighting the backdrop, selecting lighter colored clothing, or increasing your exposure.

Figure 5. It’s important to make sure your model doesn’t end up directly under the light, in which case the light would be strong and entirely on her head, blocking the light from reaching her body.
Equipment:
- Elinchrom BXRi 500W Strobe
- Elinchrom 27 x 27-inch Rotalux Softbox
- Elinchrom Skyport Speed Transmitter
- 42 x 72-inch white reflector
- Two multiboom light stands
- Black muslin backdrop
3. Simple, slimming short lighting
Short lighting and its opposite technique, broad lighting, are excellent techniques to flatter faces and bodies by creating the appearance that they are either narrower or wider, respectively, than they truly are. Short lighting occurs when the main light illuminates the side of the face or body furthest from the camera, which means that the majority of the subject’s face or body is in shadow (the side closest to camera), thus giving the appearance of a slimmer face or body (Figure 6). Broad lighting is the exact opposite, where the majority of the subject’s body is in brighter light, creating the appearance of a wider body. So just by choosing which side to photograph your subject from and which side of the light to place her on, you can affect how wide or narrow she appears.
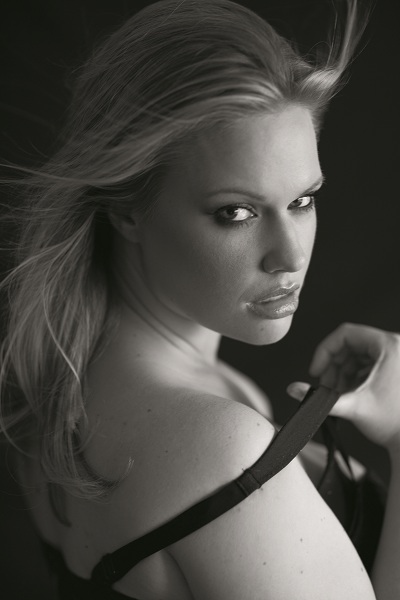
Figure 6. This curvy gal’s face and body appear slimmer with a classic short-lighting setup.
85mm lens, ISO 400, f/2, 80 sec.
When shooting indoors and shooting with natural light, my subject is positioned to the side of a window (the main light source) with black muslin behind her, either taped to the wall or on a background stand (Figure 7).
Equipment:
- Black muslin backdrop
- Household fan

Figure 7. Vary your subject-to-light distance according to how strong the light is and whether or not you have diffusing material. I like to start about six feet from the window and then tweak it from there.
4. Full-length flattering lighting
For more fashion-style boudoir and full-length portraits, I love the ease of a big Octabox. Placing your main light slightly above eye level, angled down, and just off to the side in front of your model is my preferred position (Figure 8) to add a touch of shadow and dimension to her body and create a pleasing shadow under her chin (Figure 9). Placing the fan directly under the light will create wonderful movement in her hair and clothes (if she’s wearing any).
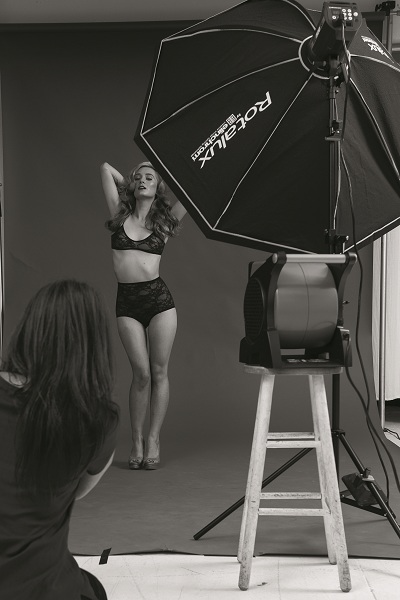
Figure 8. The fan and the Octabox are as close as possible to being directly in front of the model without getting in me shot.
Since we were shooting a full-body shot in Figure 9, we chose the 53-inch Octabox, which creates some of the softest and most beautiful light. This is plenty to light a full-length subject as well as the background if you bring your model close enough to the backdrop. Here, the model is about four feet from the background (Figure 10).
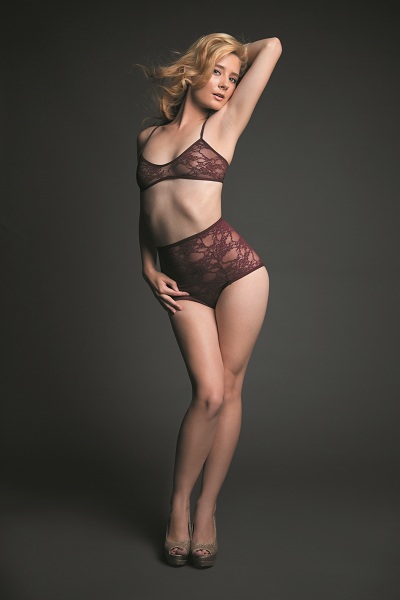
Figure 9. This is a flattering look that works well with almost everyone.
50mm lens, ISO 200, f/2, 160 sec.
Equipment:
- Elinchrom BXRi 500W Strobe
- Elinchrom 53-inch Rotalux Octabox
- Elinchrom Skyport Speed Transmitter
- Multiboom light stands
- Gray seamless backdrop

Figure 10. This behind-the-scenes show shows how high the light is and its slight downward angle, as well as the low angle I shoot from to flatter full-length bodies.
5. Side lighting to dramatically enhance or reduce curves
This dramatic look is extremely flattering to body conscious women, whether they are looking to create curves or de-emphasize them. By placing the light source directly to the side of the subject (and either slightly in front of or behind her) and moving yourself on an arc in front of or opposite to the light (Figure 11), you can create a number of looks. (See chapter 6 of my book for examples).
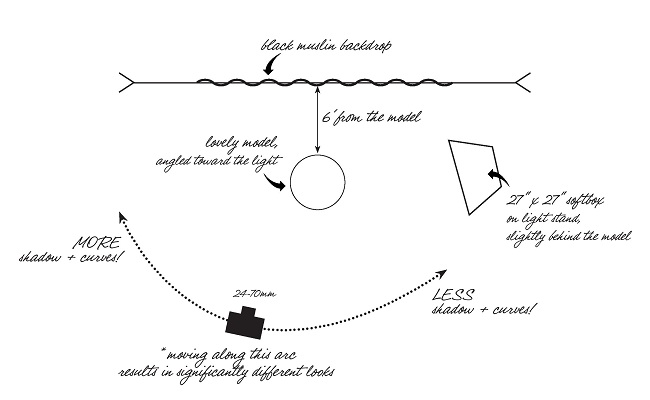
Figure 11. This diagram shows the arc that you can position yourself along to have either more or less of your subject’s body fall into shadow.
The 3 biggest lighting mistakes and how to avoid them
The biggest mistake my students make in terms of lighting is neglecting to pay attention to how the light is falling on the model’s face. Make sure you know where your main light source is and that, in particular, it does not fall below her face, which casts very unattractive shadows I call “horror lighting.” Light her intentionally. Any shadows should be “drawn” for a reason, and make sure that if your assistant is holding the reflector, she doesn’t inadvertently lower the reflector as her arms tire, causing the fill light to come from below your subject’s eye level.
Another misstep I often see is that the subject is lit so flatly that there are no pleasing shadows creating interest, depth, or flattering curves. Make sure you angle yourself or your light to create some depth with shadows, and experiment with not using a fill light, unless a flat look is what you are intentionally going for.
Lastly, some students become so preoccupied and distracted by their lighting equipment that they forget to engage with their subject, resulting in a moment that lacks interest. Keep in mind that connection with your subject takes priority; it shouldn’t be sacrificed to fiddle with gear. Find your best light, tweak it, and then practice bringing your focus and attention to creating a rapport with your subject. Gently remind yourself of this throughout the shoot.
6. Sexy noir lighting
The deep shadows and strong highlights of film noir are a natural fit for boudoir photography. This look is a fun one for women looking to evoke a certain era or who love the extreme chiaroscuro look and drama of the darkest blacks and lightest whites (Figure 12).
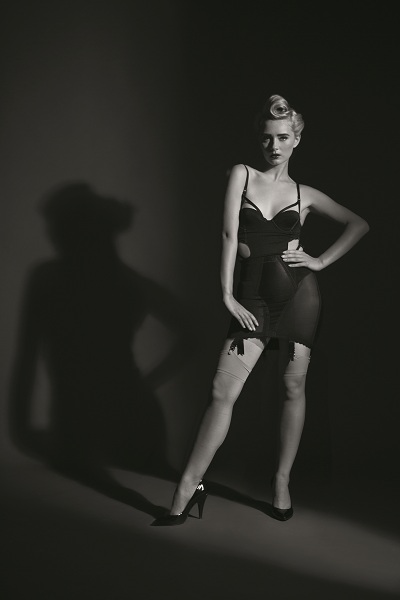
Figure 12. I kept the model bright and the background dark without blowing everything out by exposing for her fair skin.
50mm lens (with .9 neutral density filter), ISO 200, f/2, 160 sec.
While there are a multitude of ways to create this look with other equipment, I thought it would be great to show this setup using the same gear we’ve being using for the rest of this chapter. Using the medium softbox off to a 45-degree angle, we aimed it at our model. To narrow the light and keep it from spilling onto the backdrop, except where we desired, we put two flags in front of the light (Figure 13).
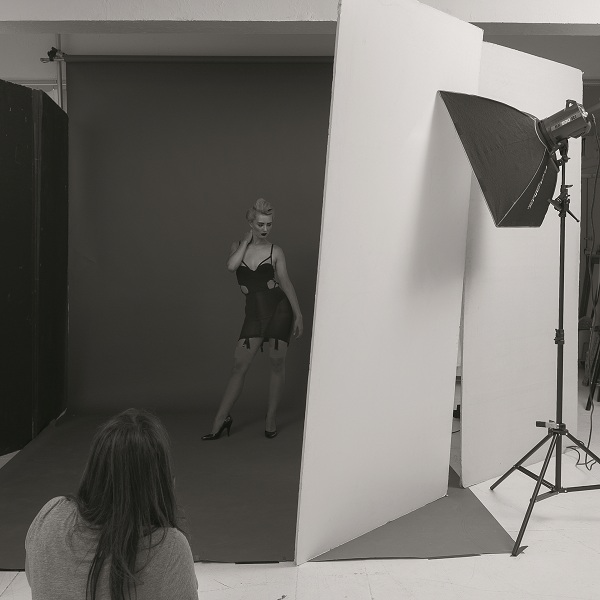
Figure 13. This behind-the-scenes photo shows how close together the flags are (only a couple of inches apart).
Equipment:
- Elinchrom BXRi 500W Strobe
- Elinchrom 27 x 27-inch Rotalux Softbox
- Elinchrom Skyport Speed Transmitter
- Multiboom light stand
- Two flats used as flags Gray seamless backdrop
7. Universally flattering clamshell lighting
Clamshell lighting is very popular for beauty closeups; it’s super easy and simple, and it flatters everyone. The main light is raised above the model and angled 45 degrees downward, and the silver reflector acting as fill light is at her waist level, angled 45 degrees upward (Figure 14), which looks like a clamshell from the side.
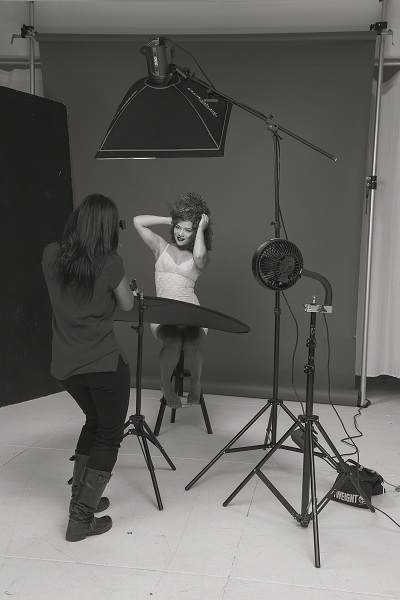
Figure 14. You can see how the reflector is positioned on her lap.
This is a quick, no-fuss setup. The light is soft and wrapping, great for women of all ages. You can do this with an umbrella, a beauty dish, or even natural light. It’s a good trick to reduce the appearance of blemishes, under-eye shadows, or bags, as you can see in (Figure 15). You still see light shadows, which I love, but they are so subtle, and this woman seems to glow from within.

Figure 15. The silver reflector eliminates deep shadows, creating a luminous glow.
50mm lens, ISO 200, f/2, 160 sec.
Just make sure your subject doesn’t lean too far into the shot, or she will be more lit by the silver reflector, which will create that upward unflattering horror effect—not good on anyone! You want to make sure the top light is brighter than the lower fill.
Equipment:
- Elinchrom BXRi 500W Strobe
- Elinchrom 27 x 27-inch Rotalux Softbox
- Elinchrom Skyport Speed Transmitter
- Multiboom light stand
- Gray seamless backdrop 42 x 72-inch silver reflector
8. Seductive and flattering feathering
I love the look and mystery of a form disappearing into the background. This is another technique to flatter women of any size, since you can’t see where the body ends (Figure 16). It just disappears into luscious shadow. Place the light with softbox on a 45-degree angle from the model and turn the softbox away from the subject so she is lit only by the edges, where the softest light is. This technique is called feathering the light and provides a supersoft, even light. You will likely have to place a flag between the light and the background (Figure 17) so the light doesn’t spill onto the backdrop, especially if you are using a larger softbox.
Figure 16. The light is soft and gradually falls off into shadow.
50mm lens, ISO 200, f/2, 160 sec.
Equipment:
- Elinchrom BXRi 500W Strobe
- Elinchrom 27 x 27-inch Rotalux Softbox
- Elinchrom Skyport Speed Transmitter
- Multiboom light stand
- Black muslin backdrop
- 42 x 72-inch black reflector used as a flag
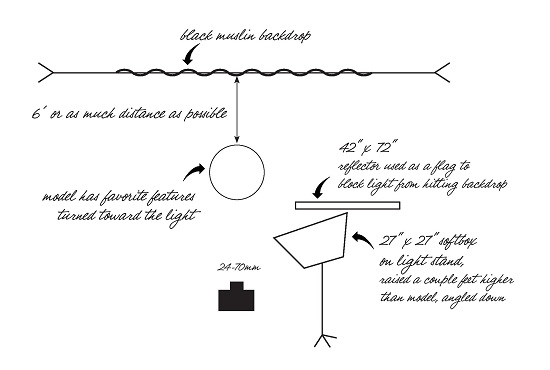
Figure 17. The softbox is aimed almost entirely at the background and away from the subject.
Copyright © 2013. Used with permission of Pearson Education, Inc. and New Riders.
Christa Meola
Christa Meola is an internationally recognized photographer who travels the world for portrait commissions, speaking engagements, and teaching. She has enjoyed life behind the camera since the age of six, when playtime included dressing up with friends and taking pictures. Currently based in New York City, Christa is the founder of the Online Boudoir Workshop and creator of the Money Shots. Learn more at ChristaMeola.com.
Follow Me:


May 09, 2019 at 3:23 pm, Don said:
Great article. Thanks so much for sharing the techniques.
January 20, 2016 at 4:49 am, Frank Nazario said:
What an awesome piece … thank you for this article absolutely perfect to do a full day of photo practice work with it. and the lucky model that volunteers gets a killer portfolio!
October 06, 2015 at 7:32 pm, Robert Nevius said:
Thank you so much for this! I’ve only every used natural lighting but this really makes me want to start putting a light kit together! Awesome article.
September 10, 2015 at 2:17 am, muzza66 said:
great tips – thanks
January 31, 2015 at 6:23 am, Fhm Rio said:
It’s Very interesting.
January 30, 2015 at 1:16 pm, Lex Arias said:
Excellent
December 23, 2014 at 5:01 pm, Tom Upton said:
Christa is awesome, generous and creative. BUY THE BOOK. The slot of light is really delightful. There is no end to exploring light.
March 26, 2014 at 4:38 pm, Seth Balmore said:
This is such a well-written and informative article. One of the best I’ve seen. I admire the variety of techniques shown and how they can be used in the real world.
March 15, 2014 at 7:18 am, Morgan said:
Wow! Such a great article! Thank you for sharing.
January 23, 2014 at 10:23 am, Jody Read said:
Thank you!!
May 29, 2013 at 5:21 pm, Duane Stevens said:
Several good tips! And many inspirations. Thank you!
May 20, 2013 at 9:19 pm, Grzegorz Robert Giebas said:
Great job. Simplicity of form at the same time with the full set of information. thanks!
May 18, 2013 at 6:08 pm, Richard Hryckiewicz said:
Great article, very informative and love the examples of both diagrams of the setups and shots of the real thing.
May 15, 2013 at 9:24 am, Jaye Swift said:
This was very informative I have a boudoir session coming up so I will attempt some of the techniques suggested… Thanks for sharing…
May 15, 2013 at 9:22 am, Jaye Swift said:
This was very informative… I have a boudoir session coming up I’m thinking of using some of these techniques. To get a different look from what I had in the past…thanks for sharing..
May 15, 2013 at 2:53 am, Jenifer Veeder said:
love the article. thanks so much
May 15, 2013 at 2:10 am, Lou said:
I would’ve found this much more informative if it was actually geared towards shooting women who require flattering, not just your “usually hot model types”. Just sayin’.
May 14, 2013 at 7:00 pm, Jesse J McClear said:
Thanks for this!
May 14, 2013 at 2:59 pm, james said:
Thanks, great info
bear in mind most of the camera settings are inaccurate
May 14, 2013 at 2:48 pm, Floyd E Harris Jr. said:
I found this article confirms what I have read in books by Bill Pegram and give nice diagrams for the positions of the model and key elements in creating these images and explanations. Thanks for the good information Christa.
May 14, 2013 at 12:45 pm, Punkandglamour said:
Bookmarking this one.
May 14, 2013 at 11:37 am, Dan said:
Great article, one question on the wind. You prefer it going the same direction as the light…is this because the hair catches the light better or because it looks weird going against the light?
May 14, 2013 at 11:13 am, ted939 said:
Good article!
I do wonder, though, why she’d make the point in #3 that “Shooting from the shadow side is slimming”, and then say the opposite is so in #5 with “More shadow+curves” and “Less shadow+curves”. Anybody know about that?
May 14, 2013 at 10:47 am, Samantha K Henderson said:
I have been considering purchasing this book on Amazon for my kindle for a while and this article confirms that I need it. Excellent article. Thanks.
May 14, 2013 at 10:30 am, Josh Tequila Galloway said:
Great article, thanks.
May 13, 2013 at 10:44 am, DEN|ART NY said:
Thank you so much for sharing this, Christa. I’ll definitely give these a try!
May 13, 2013 at 12:50 am, tedmills said:
Great article, some I knew, plenty I didn’t!
May 12, 2013 at 8:55 pm, Twalter Duncan said:
wonderful information, thanks for sharing!
May 11, 2013 at 3:06 am, David said:
This is a good example of what an article should be like, very informative, good work!
May 11, 2013 at 3:00 am, Guest said:
This is a good example of what an article should be like, very informative, good work!
May 11, 2013 at 12:48 am, Glady said:
I can’t wait to try out the Noir light set up!
May 10, 2013 at 5:12 pm, William Spear said:
Wow! Outstanding post! I think I’m getting better just thinking about this post. Awesome!
May 10, 2013 at 6:31 am, Lissarette Vasquez said:
Christa always does an amazing job! seeing myself featured in this article made me so proud of working with her! She’s like the best of the best!
May 14, 2013 at 8:06 pm, smransom51 said:
Lissarette, you look great shot by Christa. I knew it was you when I saw the email from model mayhem. I have Christa’s book on Boudoir photography. My photos of you are still my favorites
May 09, 2013 at 2:21 pm, Ricky Tang said:
This was very instructional and I’ve Bookmarked the page in my photography folder!:) Definitely going to print this as a lighting manual for future shoots!:D
May 09, 2013 at 2:04 pm, Amanda Rascon said:
Amazingly detailed and informed article on a very important subject. thank you for taking the time to write this!
May 09, 2013 at 11:50 am, ruatria said:
This is something I would print out and keep. Wonderful ideas! Thank you so much for taking the time to put this together and share.
May 10, 2013 at 11:19 pm, ruatria said:
I should’ve known this was by you, Christa! This is Gwen from the Westons’
May 09, 2013 at 11:41 am, Bruce Charles Currie said:
Outstanding simplicity!