The Shot: Behind Glass
I want to preface this by stating that I did not and continue to not know what I’m doing. I just make things up as I go along and once in a while it actually works. This was one of those times and somebody decided I ought to write about it. So, here goes…
Inspiration and Concept
I’ve previously done a lot of work with models in showers and bathtubs; it’s kind of been my thing since I started working with models and was even my entire portfolio at one point. This is mostly because they have been the only locations in my home or hotel rooms that I feel are even remotely worth photographing. I work with available light and bathrooms are usually brighter than bedrooms—my last shower shoot afforded me the opportunity to shoot E-string in a nice glass shower which is something I don’t typically have. [https://www.modelmayhem.com/portfolio/pic/27454095 18+]
While new and fun, it was not without its problems. For one, if you’ve got a model in a shower they’re obviously going to want hot water which makes steam and fogs up the glass and your gear if it’s not something you’re prepared for. So you can either make the poor girl freeze or you spend most of your time wiping down the glass and your lens and less time actually getting great shots. By the time they’re posed right and you’re ready to take the shot of your life, the glass has fogged again. This shoot involved a lot of wiping the glass down and improvising. Also, if the shower is fully enclosed and you’ve got the fan and the water on the model probably can’t hear you give directions. It’s a fun little game of charades, especially if you try to tell them to hold a pose but they think you mean flail around. [https://www.modelmayhem.com/portfolio/pic/27469465 18+]
Shooting a model behind a wet pane of glass was something that I really wanted to explore more, but with less headache and more control. So, I took the idea out of the bathroom and onto my living room floor.
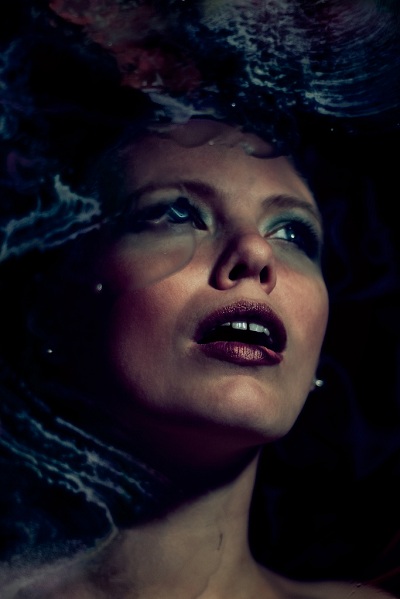
Photographer: Apodyopsis; Model: NevaehLleh
Technical Details
This is by no means the one true way to accomplish this effect, but it was the easiest and cheapest setup that I could come up with over a weekend when I had a model staying with me.
The shopping began at Home Depot, where I chose the sheet of Plexiglass I wanted. I decided on Plexi over regular pane glass partially for safety and price reasons, but mostly because Home Depot is open until 10pm and I didn’t know where else to pick up a giant single pane of glass that day.
I personally wasn’t sure if I was going to be shooting macro shots, head shots or full upper body shots, so I went for the biggest sheet I could fit in the car, which turned out to be roughly 4 x 4.5 feet. I typically shoot models that are pretty tiny so for my purposes it was large enough.
I then picked up some wood to make a frame. Plexi is unfortunately fairly flexible in large sheets, and I didn’t want it bowing in the middle or falling off its supports –this is one instance where regular glass would have been better.
In the end I opted to just Duct tape the Plexi to the wooden frame that I built because a) I’m lazy and b) I wanted to easily remove the Plexi and toss it in the bathtub to wash it—we’ll get to that in a minute.
Finally, something that I did not buy the first time around and highly recommend you do buy if you go the Plexi route is a specific Plexiglass cleaner. As it turns out, the ammonia in typical household cleaners like Windex will eat up the Plexi, leaving it cloudy and scratched. Even your typical paper towel can leave scratches, so be careful. I wasn’t, and I now have a scratched piece of Plexi. While it’s still useable for what I want to do with it, you may take a far more detailed approach in your work and those scratches could become your worst nightmare. Obviously, this is another advantage of regular glass.
Once home and armed with a framed piece of Plexi more than half the size of myself, I had to find something to support it with. I decided that I wanted to set this up horizontally with the model lying flat beneath it. This would allow me to have full control over the liquid placed on top of it, rather than the uncontrolled streams, drips and constant reapplication that vertical glass limits you to. This is why I mention safety as a factor for picking Plexi. I don’t need a giant sheet of glass suddenly shattering while someone is lying beneath it. (Who knows why that would happen, but I wanted to be sure it wouldn’t.) What types of material you use is entirely up to you, but know the pros and cons of each and be careful.
For supports, any four or more objects of the same height taller than a model lying on their back will do. I used four bottles of cranberry juice because that’s what was in my house. It doesn’t really matter what you use so long as it supports the glass and stays out of your shot. For me I wanted the glass very close to her body so these bottles were perfect. The Plexi sheet was only a little more than an inch or so above her. You might want it at some other height so boxes or chairs might work for you. Experiment until you get it right. Note that the closer the glass is to the model (combined with your lighting) the more defined the details from the liquid will be on their skin.
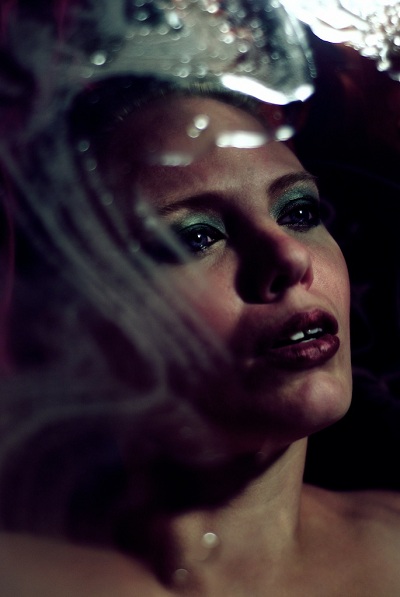
Photographer: Apodyopsis; Model: NevaehLleh

Photographer: Apodyopsis; Model: NevaehLleh
I laid down a plastic tarp/drop cloth beneath my setup. Make sure it’s bigger than your actual set (trust me).
I used a handful of differently colored silks as a backdrop, but in the end they didn’t really make much of a difference because I wound up just doing head shots. You can use anything you’d like from actual backdrop cloth or paper to fabric scraps, sheets, shower curtains, trash bags or whatever makes you happy.
I played around with a variety of liquids from water and clear cooking oil to clear dish soap. (This is why I needed to put the Plexiglass in the bathtub when I was done –you don’t just wipe off dish soap and cooking oil.) With the liquids I tried splashing them on, dabbing them on with a sponge, using a spray bottle and swirling them around with paint brushes and towels. I eventually just applied them with my hand. I wanted the liquids to be clear, but you could of course go with something opaque or colored. I didn’t completely cover the Plexi in liquid, but instead moved it around until it formed beads, puddles, streams, suds, etc.
Looking back, I should have bought an 8×11 inch piece of Plexiglass that I could try all these different options on and then easily rinse off rather than experimenting full-scale and making a big mess. I would absolutely suggest you go that route so if you don’t like a result you don’t need to dismantle your entire setup to fix it.
You’ll probably need a stool, chair or ladder to get high enough above your model. Try not to fall (She can’t catch you.)
I don’t have any lighting or camera advice to give. It really all depends on your skill, what equipment you’re working with and the final result you’re looking for. Personally, I worked with a single hot light because it’s what I have and I moved it around a lot. The advantage I found in using that rather than strobes is that I was immediately able to see where the highlights and reflections were on the liquid and glass and either move the light, move myself, or move the model. I have yet to try it again with a strobe.
This is what my setup looked like before I started making a big mess. It’s super fancy.

Photographer: Apodyopsis; Model: NevaehLleh
Post-production
My post work consisted of the usual cropping, straightening and skin touch ups, as well as contrast and color adjustments. I don’t have any specific advice to give in this area either, beyond doing what makes you happy.

Photographer: Apodyopsis; Model: NevaehLleh
Result
I got what I wanted, which is truly all I strive for and honestly don’t always get (it’s even better when the model is also happy with the results.) I personally learned quite a bit, from the need to actually think through my setup (before you’ve got a model lying on your floor trapped under a piece of glass covered in water) to how to manipulate a unique circumstance of light and shadow. This Plexiglass option definitely has its own set of merits and while I would not completely replace a shower for shoots with this setup every time, I do think knowing how to use both is valuable in achieving the right result. It’s definitely a setup that I plan on revisiting.


February 22, 2014 at 7:36 am, Rockanroll Casanova said:
I’ve been trying this for some time with no results, thanx!
January 29, 2014 at 2:38 pm, asoldiercanoff said:
To me, experimenting is the name of the game and it was nice that you shared all the little details of your bare-bones set-up, as much can be accomplished without tons of pro gear as I do the same myself and found this to be quite an interesting attempt.