Fashion/Beauty Lighting for Nude Portraits
Clamshell Lighting
Why clamshell? Well, it’s called clamshell because the main light source is arranged in front of the model in a way that resembles the look of an open clamshell (V-angle).
What’s It For?
Clamshell lighting is a common way to photograph a headshot and beauty close-up, often used in the fashion world. The general idea is for you to take 2 light sources, or only one light source and one reflector from the front. It’s super easy and simple, and it flatters everyone.
Now imagine that you are using “fashion-lighting” for your nude portraiture – I think that’s an interesting design because you cross borders with it. I always recommend to mix genres (like with my guide fashionNude Poses [NSFW] where you leave the stiff, common and dusty glamour posing behind).
A Word about Limitation… and Uniqueness
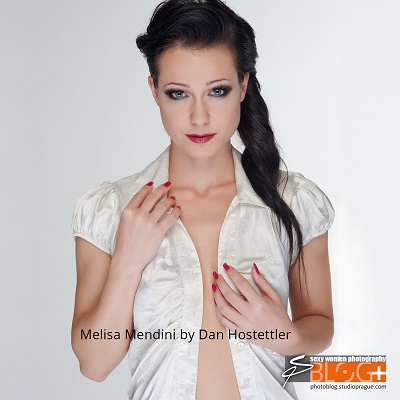
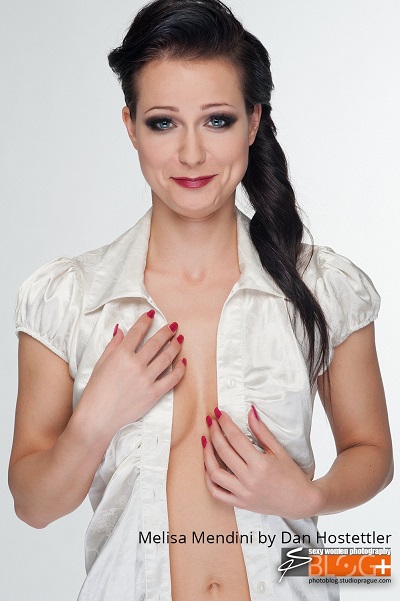
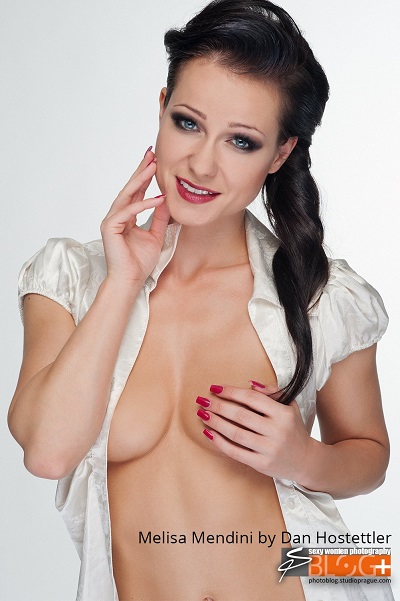
Your shooting axis and freedom of movement will be very limited due to the light arrangement. There will be light modifiers on front top and bottom that will interfere with your framing and angles. It’s a static setup. Also, the model’s ability to pose with her body is very limited. With this light design, it’s all about your model’s facial expressions [NSFW] and the subtle play with her upper body, shoulders, arms, and hands. And believe me, you can shoot a gorgeous topless beauty series! Despite all the bungling and “limitations,” you will go with a fantastic lighting and creating unique beautiful catchlights in your model’s eyes!


The Setup
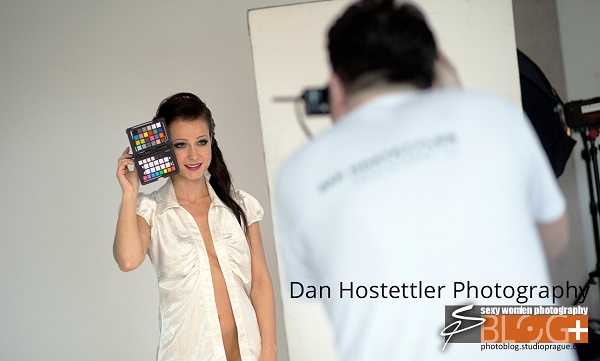
Principle: The key is above your model’s head pointing down at 45 degrees and the fill is below her head pointing up at 45 degrees.
For this shot, I use a 2.5×4’ (80x120cm) softbox as the key from front top. For the fill I also go with a 2.5×4’ (80x120cm) softbox, but this time from front bottom. The reason for this kind of setup is that I want to create almost identically shaped catchlights in my model’s eyes.
I could go with an octobox as a key and a square softbox as a fill. But then one catchlight would look round and the other one square. I don’t like this mix as it comes across very disturbing.
Alternatively, you can use two shoot-trough umbrellas for key and fill (= 2x catchlights, round in shape).
To get the white seamless paper background more illuminated and create a graduation, I simply popped a Ø4’ (Ø120cm) octobox towards it to brighten up the right backdrop area.


Tech
- 3x 400 Ws Monoblocs
- Key light: Softbox 2.5×4’ (80x120cm), powered around 250 Ws
- Fill-in light: Softbox 2.5×4’ (80x120cm), powered around 190 Ws
- Background light: Octobox Ø4’ (Ø120cm), powered around 280 Ws
- Nikon D700
- Nikkor AF 85mm / 1.8
Credits
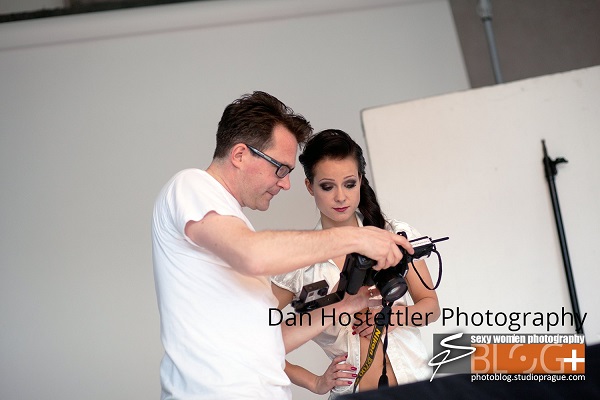
- Photography: Dan Hostettler
- Model: Melisa Mendini
- Hair & Makeup: Aneta Lozkova
- BTS photography: Jan Prerovsky
Behind the Scenes


—
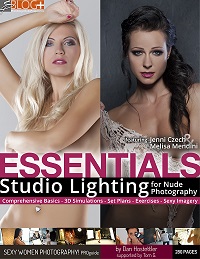
ESSENTIALS: Studio Lighting for Nude Photography – by Dan Hostettler
If you liked this article there’s much in Dan’s 280-page book, which features Jenni Czech and Melisa Mendini, delivers the perfect “one size fits all” access: theory, showcases and exercises photography newcomers, amateurs, aficionados, and versed pros.
And, Model Mayhem readers can get a 25% discount by using the promo code: MAYHEM25
Also, check out the video preview on YouTube.
Dan Hostettler
Dan has been a professional beauty and nude photographer for more than 15 years. He is Swiss born and currently living and working in Prague (Czech Republic). Dan founded his flagship business, StudioPrague, which includes a dedicated production company that has received international recognition and offers private, high-end workshops. Aside from his own creations, Dan has been internationally published and featured among others on and in GQ Online, The India Times, FashionONE TV, GoodLight Magazine, MUZE Magazine, FOTOdigital. His book,ESSENTIALS: Studio Lighting for Nude Photography, is on sale now.
Follow Me:


October 20, 2018 at 12:20 pm, tsigili said:
Studio Prague has been around for a good while. While this is a basic lighting set up, and while I would do it a bit different, this is one perfectly good way of doing a basic lighting. Since very seldom, do 2 photogs have exactly the same equipment, you have to find what works best for you, with your equipment, which can affect your own set up to some extent.
I would agree, the fill is slightly hot, but a reflector would only do well for a half length shot, and if you backed up for a 3/4 shot, it would be inadequate.
I would prefer to use a little more of a 3/4 lighting angle, since the fashion set up is really for clothing, and not unclothed, as you can see, from keeping the texture detail in the fabric of the top. With a dark haired model, like this, I would also want more highlights in the hair, so a hair light is something I would add, and normally I wouldn’t choose a light background with dark hair, either.
That said, no 2 photogs work the same, and different approaches are too be expected.
October 20, 2018 at 10:54 am, Hugh McCullough said:
It escapes me why people tend to make things more difficult than they are. A Nude is nothing more than a full-length Portrait and Portrait lighting is entirely acceptable for the lighting thereof. Conversely, a full length Portrait, Clothed, does require critical adjustment for the different textures of clothing (some reflect and some absorb more or less light), matching the various colors within themselves and the background (if other that a plain white or black), making such a bit more to think about. In the ’70’s & ’80’s, I did considerable Nude photography (maybe a couple hundred over that period), but mostly outside as California has a veritable plethora (I always loved that word) of locations from woods, to ocean, to plains. The reason I chose to shoot outdoors was my feeling of inadequacy to creating the beautiful indoor background set-ups as did Playboy. Outdoors, my work was usually equal, and in a few cases, better (yeah . . . very few). But, I was compared a few times to Peter Gowland- the best of all Glamor Photographers. Wish I could have known him personally. My philosophy: “KISS” (keep it simple Stupid) 🙂
February 23, 2018 at 5:58 pm, Jon L. Miller said:
Dan, I can see how you’ve used the setup and understand it. However, to get a round backlight effect on the background this would not happen using an octabox from a side angle. It would require a grid or a grid on the octabox and even then it would not be an evenly lit backdrop. All I can see is a spread of the light fading from bright on the right to lesser light on the left. Is there a reason you don’t balance this with 2 lights on the backdrop?
February 23, 2018 at 11:24 am, chrispi004 said:
this is how MM shows all levels of experience how-to lessons sure theres a great amount of “pros” here and i think all the members collectively show the WORLD theres always a new perspective. to me we should either give a positive remark or turn the page no one is forcing anyone to view this page — man up or go away leave hate outside
February 22, 2018 at 12:06 pm, LJRhodes said:
Why do these kinds of articles only focus on female models? Why is the male figure so under- or even unrepresented in these kinds of posts on MM? I’m asking in all sincerity. I want to know why the editors of the site seem to have such disdain for the male form. Are they homophobic? Are they concerned their users are and don’t want to risk ruffling their feathers? Have they ever featured an article from someone that focused on male models/nudes? If so, are there links? What is the reason? I’m curious.
February 21, 2018 at 11:42 pm, Johny Willemyns said:
The golden rule on lighting : If you can do it with 1 light,then do it with one. This setup not only gives “flat” results, it is making things over complicated ! I see that he uses a big octa to lighten the BKG ??? Trow away all the lights, and only work with the octa IN FRONT of the model (45 degrees). Then shoot, change the position a little bit, shoot again , untill it is to your liking…
February 22, 2018 at 11:32 am, Schwanger said:
I agree, I can’t see the model having a mobility for different shots. WStill I appreciate him sharing his technioques.
February 21, 2018 at 7:03 pm, uustor said:
Flat boring lighting, may as well be ring flash. Could be improved with black flats to either side to add some contrast.
October 21, 2018 at 10:49 am, Paul Tryba said:
Exactly
February 21, 2018 at 3:53 pm, ThePParadigm said:
This ‘article’ (?) demonstrates how MM showcases mediocre work and passing it off as professoinal. The images used in this article are somewhat underexposed, flat and ghastly under-lighting, leaving me asking ‘why do these males continue to post nudes/implied without any story or substance?’ It’s just more of the same male ego boringness that sells ‘cheap’ to Prosumers and amateurs. Hostettler spent 15 years being a perv in my opinion. Congratulations.
February 21, 2018 at 1:52 pm, Tomasz Bojakowski said:
I generally love the clamshell setup, and – if you have only two heads, you can always bring model closer to the background 😉 Effects ? Well… my Playboy cover was shot that way a few years ago 😉
And I agree with Don – a bottom light is a bit overpowered – but still, I would prefer using two flashes rather than reflector.
July 09, 2014 at 1:36 pm, Mike Yamin said:
Great article Dan. May I ask how you’re making those great diagrams (both versions)?
July 09, 2014 at 3:02 pm, Dan Hostettler said:
Hey Mike, thanks for the compliment! Glad you like it 🙂
2D diagrams: I downloaded once a template with all the tech stuff inside. Then I started to adapt things
3D: it’s a real great inexpensive software that simulates photo lighting for real. Download a trial here (15 days) – the viewer stays free forever. If you e.g. buy my latest lighting book you get some 3D lighting sets as a bonus 🙂
http://photoblog.studioprague.com/go/3Dlighting/EN
Hope this helps 🙂
July 09, 2014 at 5:05 pm, Mike Yamin said:
Helps a lot. Thanks!
June 30, 2014 at 10:14 pm, Don Walthrop said:
Nice explanation of clamshell lighting setups. If I may so humbly critique a bit, the same effect can be had using a reflector in place of the bottom fill light instead of a three light setup.
A reflector in place of the bottom light would eliminate any over-powering that the fill is having as your white balance test shot appears to have the fill over-powering.
July 01, 2014 at 12:37 pm, Dan Hostettler said:
Hey Don, thanks a lot for your comment and input.
You are absolutely right with the reflector and it’s a good way too when only 2 heads are available 🙂
Best from Prague, Dan