How to Light the Cyc

For those of you who don’t know, cyc is short for cyclorama. They are in most professional studios and have replaced the seamless paper almost entirely. Why? Because with a cyc, you have complete control over your background. A cyc is where the corners and seams are not visible. Cycs normally cover two sides of the studio.
Assuming that your model is far enough away from the cyc, lighting can be controlled so that the background effect can be light or dark. Colored lights, cukaloris and other patterned screens can be used on the cyc to create interesting background effects. When lit evenly, the smooth surface, even as it goes around the corner of a studio, can provide an “infinity effect” — an endless space behind the models.
You can either light the cyc or not light the cyc. I will show you the difference. To achieve an “infinity effect,” I light the background with four light heads. Two on each side. They are angled at a 45 degree angle to hit the background evenly. I use V flaps behind my lights to control flare and spillage onto the set.
This shot is using the four lights on the background effect:

As you can see, there is no shadow on the background. It is a smooth, endless appearing background.
If you want to create a black background, obviously just don’t light the background at all. With your main key lights that will be lighting the model, make sure you flag the light off the background so there is no spillage behind the subjects. In this shot, I photographed a different model on a different day but on the same exact cyc. There is just no lighting on the cyc, whatsoever.
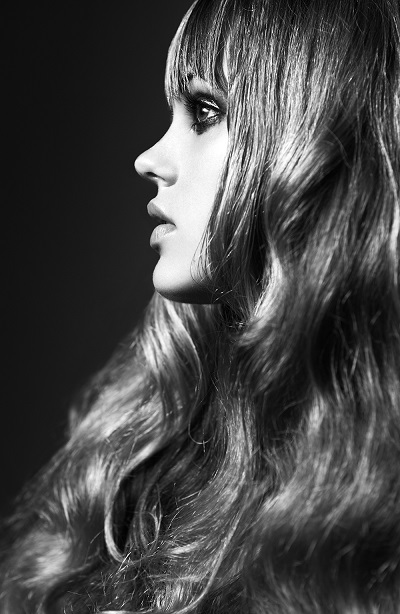
Again, the model is far enough from the background but this time it is not as important than if I had lighting on the background because I don’t have to worry about spillage from either my key on to the background or my background light spilling onto the set, thus interfering with my lighting on the model.
For mood, you can create a gradient on the background, giving the effect that the background is indeed there but not competing with the model or the overall impact of the image. You can try throwing one light on the background to create a splash of light across the back or you can use lights from different angles, I’ve even placed a light head on the floor and pointed it up toward the background to create an interesting effect. This is a shot where I used one head on the background in order to create a silhouette effect behind my model:

I shot Alex Ebert of Edward Sharpe and the Magnetic Zeros way back when he was still in IMA Robot. I threw a light with a reflector and grid on the background so he would separate from the cyc. If the light hadn’t been placed there, the cyc would have been totally dark. I wanted to add some dimension to the shot, so I threw a small light behind him.
With lighting a background or cyc, you need to experiment. Try four lights, then two lights. Meter your background and try different exposures. I get about a 1 to 1 1/2 stop ratio between my background and my key light when I intend to blow out the background and create the infinite seamless white background. When I go totally black, I just make sure I flag everything off from my key lights so there is no spillage.
One thing I would stress is that there is no “right” way. It’s entirely up to the photographer’s eye and taste on what he/she is trying to achieve. There are all kinds of formulas, all kinds of mathematics and theories out there. I’m a photographer, not a mathematician. You can go to dpreview for that kind of technical stuff. I just know what looks good and I learned that by trial and error. And in my honest opinion, that’s the best way to learn!
To see more of Melissa’s lighting set-ups, check out the Breed Master Class: Advanced Fashion Photography Lighting
—
By Melissa Rodwell
Melissa is a fashion photographer and the founder of Breed.
After graduating from the Art Center College of Design Melissa Rodwell embarked on a globe-spanning career as a fashion photographer. She has lived and worked all over the world, photographing for Ralph Lauren, Nike, Coca Cola, Honda, NBC Television, and Dell computers. Her editorial assignments have lead to her being published in Harpers Bazaar, Kurv, Jimon, Flaunt, and Playboy.
This article originally featured on Breed.
Breed
Breed is an online educational resource for fashion photographers. Breed writers and contributors are experienced industry professionals teaching and sharing current fashion photography insight through a series of videos, written articles, interviews, product reviews, and more. The Breed community also provides fashion photographers a place to connect, collaborate, share and critique work while learning valuable insight about the historically guarded and highly competitive industry of fashion photography. For more, visit jointhebreed.com.
Follow Me:


August 25, 2016 at 7:26 am, peety3 said:
“V flap”? Isn’t it almost universally called a “V-flat”? And I love the bit about angling the four lights on the background at a 45-degree angle for evenness….only if your lights went to the same school of math as you.
August 24, 2016 at 5:16 pm, Abrimaal said:
If you spoke Polish, you’d know that lateral lighting is the best for cyc 🙂
November 13, 2014 at 10:41 am, David Rich said:
I can certainly see the advantages here, if done well. I am a licensed Contractor for the last 2 decades and have worked with these sort of building materials, yet I see from the examples I had googled that this would be quite a challenge to build for an experienced framer, and then to have a sheet-rock guy come in to smoothen it out to a near flawless curvature, and a painter after that, so this would be very costly. Some where between $3k to $10k; with an 80% likelihood you will not be satisfied with their results. This will also require some extensive cleaning after most any use, and repainted frequently. Also, changing the color or texture would also be no simple process, and quite smelly for weeks after repainting it making it near impossible to use. To suggest this has or could ever replace a simple inexpensive paper back drop is quite absurd!
November 13, 2014 at 8:49 am, James Dickens said:
only one of the images shown utilizes the cyc. the other three could have been done against cloth or paper instead of using a very costly and difficult to construct cyc wall. when i shot large product in the studio, i used the reverse side of a 12 ft wide roll of linoleum. it was better than paper. it could be painted as needed and was much less expensive than a cyc.
November 13, 2014 at 7:12 am, Erik Brummerstedt said:
Thanks, Melissa. Enjoyed the article and sharing your process.
November 13, 2014 at 5:25 am, Taylor Lee said:
Professional photoshop work on amateur lighting techniques. Clearly, the photographer THINKS she knows what she is talking about, but really KNOW nothing.
November 13, 2014 at 11:34 am, James Dickens said:
the lighting is lovely.
November 13, 2014 at 2:16 pm, Unga Munga said:
For sure to use a photoshopped lighting effect on the background the cyclorama is pretty expensive and totally useless….. I can’t agree with You more. You are going to choose a cyclorama because usually offer you enough space behind the subject to have the light falling down in a beautful and natural way, for sure not line in the pictures. Thanks for You post that help a lot to judge the article.
November 13, 2014 at 2:47 pm, James Dickens said:
i don’t get it. what photoshop “lighting effect” do you see here…?
November 13, 2014 at 5:48 pm, Taylor Lee said:
Try duplicating the shots sampled on the page without Photoshop, and you will see what’s “lighting effect”
November 13, 2014 at 5:57 pm, James Dickens said:
I’m asking for a specific answer. i’ve been doing this quite a long time and there is no “photoshop lighting effect” going on here. please actually explain your position. thank you.
November 13, 2014 at 6:01 pm, James Dickens said:
and tay buddy, i HAVE done this. it takes multiple lights, precise placement and enough studio space to pull it all off at the right apt..
November 13, 2014 at 2:57 am, BQ said:
In my humble opinion, any of the wonderful examples shown can be achieved with seamless.
There are a few reasons for a cyclorama, which need no special lighting. The first is, a cyc with a corner, in a smaller studio, creates the illusion of huge space for copy or what not with no seam. In the days of film this was important and cost effective. No need for that now with the great imaging software available.
Bigger studios shooting big products need a bigger set and don’t need a corner, Vogue studios, downtown Chicago had a huge cyclorama, must of been 50 feet wide.
My argument for the cost of a cyc is you can paint it, any shade you want, have a larger set, easier to keep the shadows off the background which gives the photographer more lighting options as Melissa indicated.
November 13, 2014 at 2:22 pm, Unga Munga said:
You are right for sure !!! Let me give You my two cents about painting a cyclorama. I have done it on mine few times…. First time I painted in some sort of platinum grey that is a very light and warm. Repaint it in pure white was not to much difficult. A second time a choose a darker color, put it white back was an hell of job. I must tell You I’m not going to paint in color anymore. Also many coat of paint will ruin quickly your cyclorama and trust me can be very time consuming to fix it. But again just my two cents on it.
November 13, 2014 at 2:44 pm, James Dickens said:
i agree, gels can be of help to nudge the bg color one way or another. i painted a red bg for a client once… never again.
November 13, 2014 at 7:17 pm, Eric Grapher said:
18% grey is ideal, imho. Then use gel lights to turn it into whatever color you wish
November 12, 2014 at 9:07 pm, Eric Grapher said:
The black background can be achieved in any studio or even the great outdoors. You simply need to expose the subject about 4-stops brighter than the ambient background, 6-stops for the purists. A cyc wall is not required. I cannot imagine why this was included in the article, especially given the example photo.
November 13, 2014 at 6:38 pm, James Dickens said:
yes, with a leaf shutter, that is generally true. outdoors, when dealing with the more common, focal plane shutter your suggestion is not workable.
November 13, 2014 at 7:14 pm, Eric Grapher said:
Really? the type of shutter changes the EV? I’ve never heard of such a thing. In fact, my light/flash meters from days of yore and the latest light/flash meters all show the same EV. 4-6 stops is still 4-6stops different regards of the style of shutter. That much EV differences casts darkness. You might be talking about sync speeds, but that is a totally different subject.
November 13, 2014 at 7:24 pm, James Dickens said:
don’t be an a hole. the proper exposure OBVIOUSLY does not change regardless of the type of shutter. what changes is your ability to choose your.. f stop… and shutter speed. perhaps you’d like to educate the masses on that…. with your grand wisdom, of course.
November 13, 2014 at 7:31 pm, James Dickens said:
I’m sorry eric my previous response was rude. my point is that an fp shutter limits your choices for shutter speed and so limits your ability to tell the story.
November 13, 2014 at 7:41 pm, Eric Grapher said:
Absolutely, but there are ways to change the exposure. Neutral Density filters can lower the ambient EV. Some use polarizer filters to do the same. There are also High speed sync and hyper sync options. You can also pick a shadow for the background. I’m sure you can think a 6 more ways to achieve a black background without a cyc wall.
November 13, 2014 at 8:48 pm, James Dickens said:
light correctly… that’s all you need to do. EV, polarizers…and high speed sync…all of that is BBBBBSSSS. Learn to shoot. decide what you want to say and learn to speak in the language of light. all of the other distractions are bullshit.
November 13, 2014 at 9:03 pm, Eric Grapher said:
The language of light is EV, polarized, etc. Even outdoors you are in control of the light. None of this has to do with the original subject of cyc walls to make dark backgrounds. I believe you know that, yet you wish to distract attention from the article.
November 13, 2014 at 9:18 pm, James Dickens said:
you make no sense eric. you should probably go back, read and actually think about what i’ve said (if you are able) before you dane to comment.
November 12, 2014 at 4:58 pm, David Meyer said:
Good photos. As for cyclorama replacing seamless… Depends on a studio. Of all the studios I was shooting at this year (and it’s been quite a few in London and Warsaw) maybe 10% had cycloramas. And they are useful. I feel though, that in this article, it would be nice to see some more scenarios showing the advantages of them. If I decide to get my own, personal studio, I feel like using seamless, or any sort of temporary background, would make more sense to me as it will allow me to re-arrange limited space with more freedom…
November 12, 2014 at 3:07 pm, 1 Moment Captured said:
I agree with Unga Munga. I also take exception to the statement that
cyc is in most professional studios and has replaced seamless paper
almost entirely. I have used cyc but in no way would I use it as my
only option for a background. I visit professional studios all over the
country and I have not seen cyc replacing seamless, painted, muslin or
other types of backgrounds.
November 13, 2014 at 2:07 pm, Unga Munga said:
I agree totally with You ! The article title mislead completely suggest that cyclorama can replace or have replaced other kinds of background. I have full cyclorama on my studio including ceiling, also I have cyclorama on my studio roof, and I’m really telling You that it can’t replace seamless background or muslim.
August 24, 2016 at 5:55 pm, Dreamjuice said:
Damn auto-correct
November 12, 2014 at 2:49 pm, jerryseyes said:
I’d be interested in what can be done with a cyc that is not possible with seamless. With examples please
November 13, 2014 at 2:10 pm, Unga Munga said:
Hello Jerry,
cyclorama is very very useful when You have to shoot a large group of people, a very large, wide subject and of course if You are shooting automotive. Also if you want to shoot people perform wide movement, like dancers You will find that the 11ft background wide are not wide enough. But for the pictures in the article look pretty useless.
November 12, 2014 at 1:18 pm, Unga Munga said:
I’m a mathematician and a photographer, and I really don’t get the point. Is it this a tutorial or a joke ? Teaching math or photo techniques must be performed respectfully of the students needs, like learning just to make an example and of “difficolta’ della materia”. Of course there is not a single formula to achieve a light design, but say that there is no right way it is a colossal mistake if you don’t suggest – at least – that there are many good pathways to the result and also if You don’t show them. My two cents.