Building your set, softbox by softbox
If you are used to shooting with just one or two lights then using several lights might seem confusing. But it is actually quite easy. It is just a matter of building your set, step by step, softbox by softbox.
#1
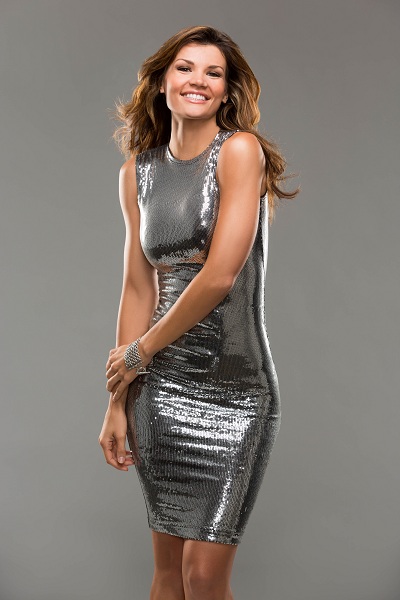
The image above (1) in this article was shot using four lights: one Profoto Softbox RFi 3×3’, one Profoto Softbox RFi 5’ Octa and two Softbox RFi 1×6’. Again, some might be intimidated by the amount of lights but the fact is that as long as you build your set one light at a time, it is almost as easy as using just a single light source!

#2
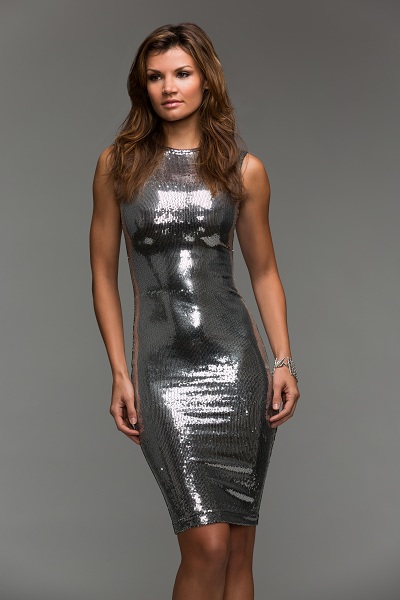
Let us take a closer look at the second image (2). This was shot using just the RFi 3×3’. The image is dark, moody and admittedly not very inspiring. But that is not the point. The point is that we begin with our main light, and when we are happy with the result, we move on…
#3
…to the third image (3). Here, we add the RFi 5’ Octa as our fill light. Now, the important thing to remember is that the fill light should not add to the character, and instead just blend harmoniously with the main light. That is the reason that we chose to work with the RFi 5’ Octa – a large light source that creates a soft and even light.

#4
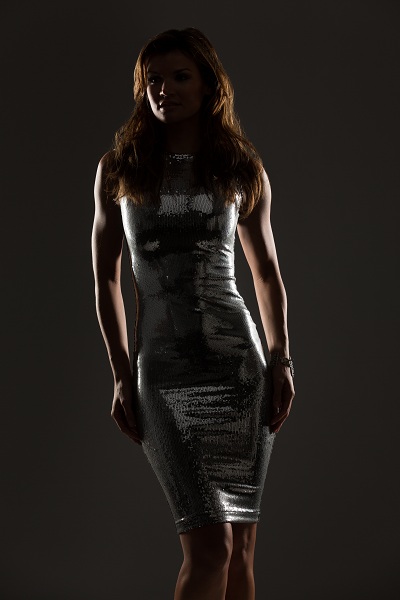
The fourth image (4) shows just the fill light, but what is really interesting is, of course, to see how the main light and the fill light work together in the third image (3). Notice how the shadows lighten up, how the eyes are revealed and how the dress starts to pop out when we add our fill light. This is actually a pretty good portrait set-up. But there is more!

#5
In the fifth image (5), we add the RFi 1×6’ strip softboxes as our rim lights. The main purpose of the rim light is to give increased dimensions and separate our model from the background.
For instance, take a closer look at the model’s arms and notice how they pop out of the image. Also, notice the rim light around her waist and how effectively it separates her from the background.
#6
The sixth image (6) is just to illustrate what the rim light looks like on its own. Note that both strip softboxes were equipped with Softgrids, which keeps the light off the background and out of the camera, and reduces flare.
Finally, let us return to our main image (1). Look at it once more, notice how main, fill and rim light work together to give life and color to the image, and remember how easy this seemingly complex set-up was when we built it step by step, softbox by softbox.
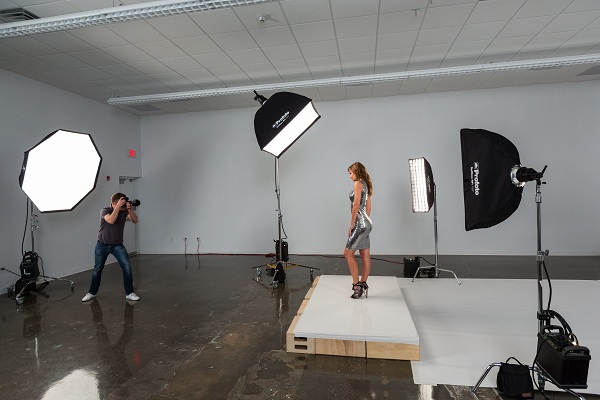
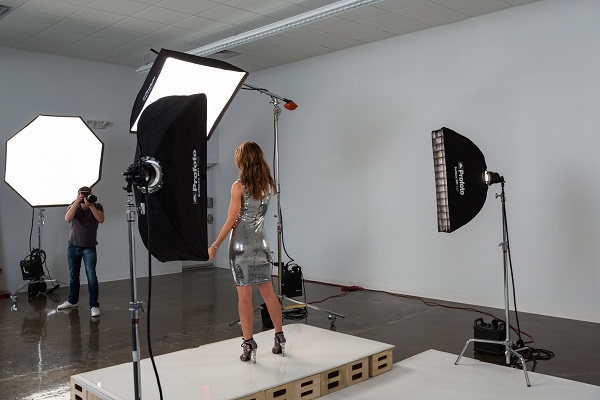
Here’s a behind the scenes look at the set-up:


Profoto
Profoto, The Light Shaping Company, is the world’s leading manufacturer of photography lighting systems. Since 1968, Profoto has been providing photographers with innovative tools to create and shape light. www.profoto.com/blog
Follow Me:


June 12, 2013 at 5:52 am, J Stinnett said:
Those don’t look like 1×6 strips lights.
June 11, 2013 at 2:44 pm, Tom V said:
Thanks for the demo and Behind The Scenes images. I think a certain proportion of light is being bounced up from your glossy floors from each of your light sources. It has to be adding a fill light. I think it is important to realize also that in your BTS images, you have another light to the photographer’s right – to provide all the ambient light (see last photo, large reflection on floor lower left, band of light on ceiling, shadows on white wall, etc.).
May 07, 2013 at 2:45 pm, Pho-TO said:
For the first time I see that somebody is so explicitly informative and clear about the set up visually. Everything (placement, distances, angles, etc.) is so clear except the lighting information/ratios—which could be relative depending on things like the subject and the dress etc. of course. Well done.
May 05, 2013 at 10:37 am, Rick Garcia said:
Great set up… I work out of a 30 x15 x9 foot high room addition.. Cramped, but effective.. LOL
May 03, 2013 at 3:12 pm, Timothy said:
Different goals and visions obviously call for different lighting, but everything is a choice that affects the outcome. So the statement “the fill light should not add to the character” is misleading and misguided–its “blending harmoniously with the main light” adds a character of, well, harmony. If that’s the intention, great, but you can’t assume it is. Light however you want, but do it intentionally and not with preconceived notions of what’s normal or not.
May 03, 2013 at 8:04 am, Deb Smith said:
That platform s a fortune in apple boxes!
Great demo though!
May 03, 2013 at 7:53 am, MJphotographyHK said:
I like photo #5, the light gives both high-light and shadows defining the models body, it adds a three dimensional look…I am a strobist fan though!!!
May 02, 2013 at 10:48 pm, jeffery brown said:
…thanks so much for this! im sure many of us lighting n00bs are all excited =]
May 02, 2013 at 10:36 pm, BestHQRetouch said:
I like this.But Can give me the video of all this set up.
May 02, 2013 at 8:03 pm, BBH Photography said:
Thanks especially for the lighting setup pictures!
May 02, 2013 at 3:46 pm, Travis Vaughan said:
Thank you for the explanation! I was going to ask about a lighting diagram but then you showed BTS pictures of the actual setup at the end.
May 02, 2013 at 12:56 pm, kenyee said:
I actually like the dark/moody one too. Depends on what you’re going for. Catalog shots generally don’t use rims…not sure why but that always seem to be the case….