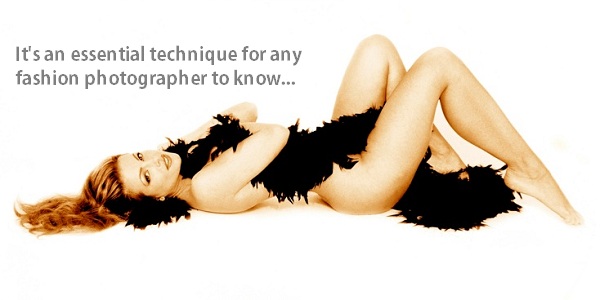
How to Create a Perfect Clear White Background
A clean white background, if used effectively, can give great impact to your images. This is especially the case if you’re aware of balancing objects in negative space, along with creating interesting shapes with your model.
The clean white background is the first and most important lighting set-up you should learn to do, along with playing with shapes that you can move around on a layout.
This technique means learning about controlling your shoot using just two elements: background (negative space) and the model (object).
The very nature of the contrast and separation between the subject and the background gives your shots great impact; it helps to illustrate and to understand composition, control framing and metering. All very helpful on your learning curve to shooting fashion.

In the fashion industry, the clean white background set-up is the most commonly used fashion lighting technique for everything from advertising fashion (creating brand awareness), catalogs and look-books (selling off the page) and editorial fashion (reflecting fashion trends).
The lighting techniques required to create a perfectly clean white background must be set-up very accurately, not allowing the background lighting to spill onto the subject (see image below), although a bit of spill-over is not necessarily wrong, if it’s a creative choice.
The technique for clean white backgrounds is described (and diagrammed) further down the page. This article illustrates lighting the subject independently from the background, either front lit, side lit or top lit, also allowing you to control the contrast of the lighting on your subject, helping you to understand and to control lighting, taking readings as well as to control the contrast of your lighting.
The techniques for setting up a clean white background

I am going to describe two variations on the technique, the first is for those lucky enough to have a large studio space with a good studio size and height above 12’ and second for the smaller studio space with limited height.

Clean white background
You need a white wall ~12’ high x 12’ wide and floor space of ~20’ wide x 30’ long, ideally use a coved studio of at least the above size if you have access to one or 9’ colorama or 10’ vinyl back drop will do the job OK for either technique if you do not have access to a white coved studio (syce studio). See diagram 1 of how the set-up should look.

Diagram 1
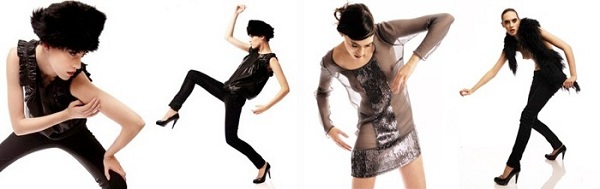
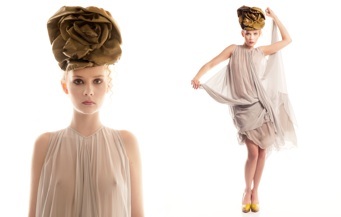
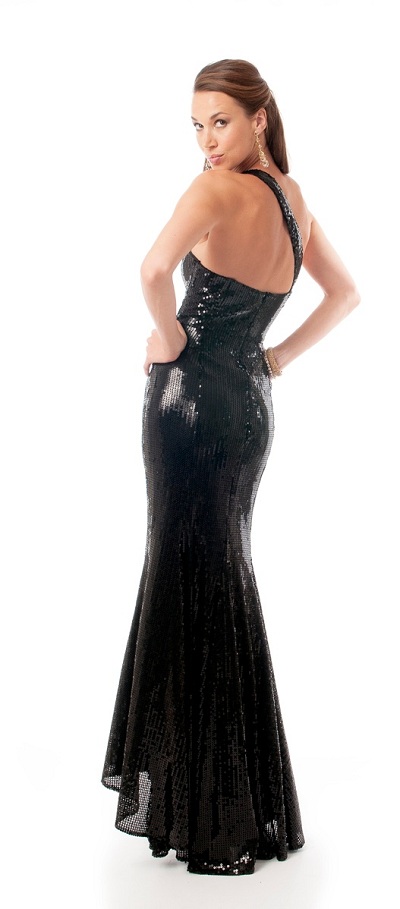
For the floor for your model to pose on you need an 8’ x 4’ sheet of very reflective white plastic sheeting, Perspex or Plexy glass are the best for this technique. This gives you a perfect reflection of the white wall when shooting at the right angle, i.e. above 42 degrees to the white reflective floor or perspex, mirroring the over lit wall but having a reflection of the models feet and legs, grounding your model so they do not float in empty space. [See the bottom of the black and the gray dress images in this article.]
You place the white reflective surface or sheet of perspex on a platform that’s 8’ x 4’x 18” high that’s very stable, you model will be standing on it. I use a sheet of ply wood at least 3/4’s of an inch thick on top of 9, 2” thick polyboards but you can build a purpose built platform if you have the resources to do so and you’re going to use it a lot.
You will need 6 to 8, 8’ x 4’ poly boards that are painted black one side and white the other side. I hinge mine with gaffa tape so I can create hinged L’s that stand up on their own to use as flags to block light or reflectors to reflect light. See illustrations below showing black flags and white reflectors.
I use 2 sets of L’s with the white side facing the white wall to reflect light that’s spilling around the back ground area but mainly to shield my camera position from the back ground lights which may cause some flared light hitting my lens degrading the quality of my images.
You will need 4 flash heads of the same power to to light the background evenly, (see diagram 2 below) I use 4 x 500 watt heads with 8” reflectors attached pointing towards the white wall at exactly 45 degrees, 2 medium light stands that reached up to 8’ from the floor and grips/clamps to attach the second head 4’ up from the floor and a head attached normally on the top of the stand.

Diagram 2
This is how they need to be set-up to give you an even spread of light right across and the full-height of your white wall or background.
I set the background lighting to be 1.5 to 2 stops over the aperture that I want to set on my camera, lets say I want to shoot at f8 to f11 so I need to set the power of all of these heads at the same level to give me a light reading of f16 evenly all over the white wall.
You can choose to use black flags or white reflectors dependent on how contrasty you want to light your model. I like contrast so I will often side light my model and use a black flag L on the opposite side of my key light, stopping any reflected light from the studio walls falling onto my model decreasing my contrast.
One key light flash head ~750 to 1,000 watts are enough for most of my studio fashion shots produced as clean whites. I usually put mine onto a large boom arm but a medium or heavy weight stand will do. To this flash head I attach which ever key light modifier I decide to use, for the sake of the illustration i have used a 24” beauty light, they are very popular right now.
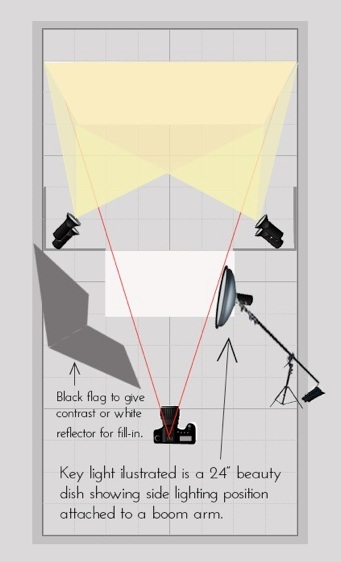
Diagram 3
For this set-up I set the power of the key light to give me a reading of f8 to f11 at the models head position, 1.5 to 2 stops less than the reading of f16 on the back ground.
We are now ready to test the set-up without model. I will start by shooting an image showing the whole set-up.
I will do bracketed images in 3 steps either side of the correct reading i,e, f8.5 or f9.5 step less. This will show me at what settings I get my model, the background and the floor perfectly exposed, from this I can adjust either my background or key lights power settings to give me the perfect clean white background.
I have set this set-up many times in studios that are very similar and had results that vary greatly so test this technique out for yourself in your own studio or home to see what results you get.
Clean white background (for limited studio space)
Diagram 4 (below) is an illustration of a simple clean white background set-up to use in limited studio space. The black and the gray dress images are both shot with this clean white background set-up.

Diagram 4

Equipment:
- Camera: Nikon D300
- Lens: Nikon 17mm to 55mm f2.8
- ISO: 200
- Shutter: 125th sec
- Aperture: f8.5 – f9.5
You can learn this lighting set-up plus many more of my lighting techniques for fashion hands on during my fashion photography courses, check out the schedule of courses that I am running this year.
Bruce Smith
Bruce Smith is a world-class fashion and beauty photographer whose work has appeared around the globe for more than thirty years. He's the author of "Fashion Photography: A Complete Guide to the Tools and Techniques of the Trade" and teaches workshops internationally. His website is www.brucesmithphotographer.com.
Follow Me:


December 18, 2013 at 3:54 pm, Jim France said:
And yes, there will be some clean up. But the less the better.
December 18, 2013 at 3:54 pm, Jim France said:
I think the key here is to have enough space between the model and the white background. The model has to be lit and the background as well. Two different subjects really.
November 20, 2013 at 6:59 pm, Klaas said:
But if you still need to clean up the scene in Photoshop or Photoshop elements, here is a free quick tutorial;
http://ocfworkshop.com/downloads/white-seamless-cleaning-up-with-photoshop/
November 13, 2013 at 1:05 pm, Canon Camera Carl said:
Thanks for sharing. Great information