The Three-Point Lighting Setup
This is the part two in a series of excerpts from ESSENTIALS: Studio Lighting for Nude Photography, by Dan Hostettler. Read part one of Dan’s Topless Portrait Series with Melisa Mendini.
1. Start with one light
Some of you are eager to go and want to start off with a bunch of lights. But I believe this to be an area where less is generally more. So try starting out with just one main light (flash head and modifier).
Once you are pleased with the quality of the first results, go ahead and assess if you require an additional secondary light.
Turning off your main light, see if a second light would really improve the scene, whether it may be for fill, hair or background.
Just be sure you turn on the main light when you are setting up the second one. Also, never lose sight of what you can create using just one light (remember, beautiful window light usually comes from only one window). So, build your look one light at a time and you’ll have better results.
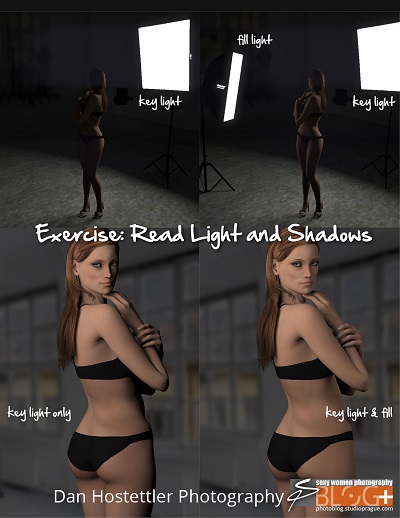

2. If something looks weird, you’re probably off by just a few inches
If you’ve got your light in position, and it just looks either wacky or bad, don’t get frustrated or think it’s all messed up – you’re probably just off by a tiny bit…literally inches. Try moving your lights in an arc, like the hands of a clock, around your subject. If you move the lights just a few inches in either direction, chances are pretty good that you will finally discover where the placement of the light source works best.
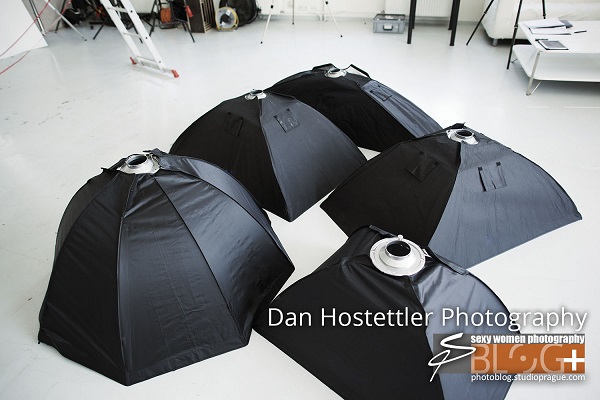
3. Spend more on modifiers than lights
Do you know the old saying: “Spend more on your lenses than you do on your camera body”?
A similar fact applies when it comes to your lighting equipment. I’ve found that all flashes emit a bright flash of light when you fire them. Really expensive ones, really cheap ones, studio strobes, hot shoe flashes – they all do basically the same thing: They create a bright flash of light. So, spend more on your modifiers – the softboxes and accessories that shape and sculpt your light – than you do on the “bright flash of light”-makers.
The Three-Point Lighting Setup
After exercising with one light, the 3-point lighting is a very grand approach to move along.
3-point lighting is the most basic lighting design for photographing flattering and balanced model photography. It’s easy to setup and not very difficult to control. It uses – as the name suggest – 3 lights.


What’s It For? Beauty & Soft-Nudes!
When working with softboxes (or translucent umbrellas), the model’s skin will appear very soft. Due to the use of a fill-in, the ratio will also not be strong and you will get quite soft shadows.
The setting also helps the model to act within a certain radius because the light beams are relatively wide. The created volume around the subject further allows her to move a bit outside of what otherwise would be a fixed position.
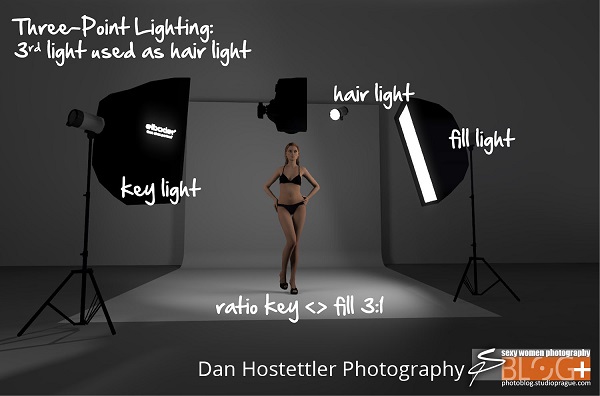
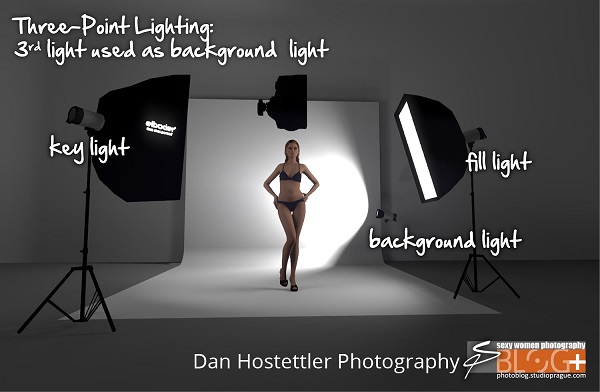
The Setup: The Three Light’s Roles
The key light, as the name suggests, shines directly upon the subject and provides the general mood based on the position, angle, strength and light modifier used.
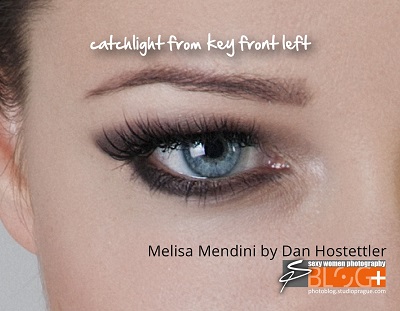
In a basic light set up, position the key in a way that lets it create an appealing catchlight in your model’s eyes. Remember: Using a softbox produces a square reflection; an umbrella/octobox results in a round shape.
Now the fill light also shines on the subject, but from a side angle relative to the key and is often placed at a lower position than the key (about at the level of the subject’s face). It balances the key by filling shaded areas and reducing the shadow casts created by the key light. Fill-in light quality should be at least as soft as the key and – as the term says – fill some light in; meaning the power is always lower than the key, regularly around 1 to 2 f-stops. If you choose to go with less fill-in lighting, then the ratio between key and fill gets bigger and this will create a more dramatic effect. That’s a great style when the results will be in black & white, for instance, but for a beauty light setup it’s too strong most of the time.
If you only have 2 lamps at hand, you can use any disc reflector as fill-in or any other materials that bounce the key light back and create a fill this way.
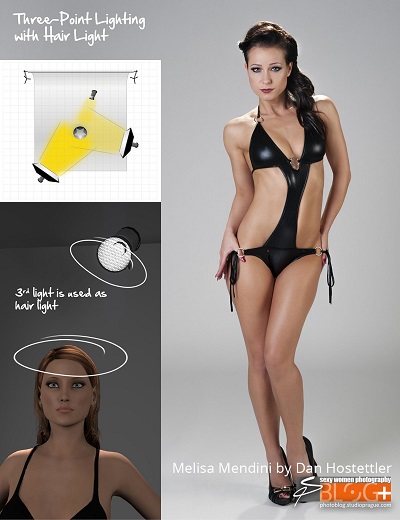
The third light basically serves in the back. You can use that lamp for the rim, hair, or shoulder light. Whatever you decide to go with, this light shines on the subject in a side or top angle from behind. Now you can either point the beam toward the model to create the hair light (with a standard reflector and grid) or rim light (using a strip softbox with/without grid). If it’s for the hair, place the flash on a higher position and tilt it down to shine towards the back of the model’s head.
For rim, the height should be leveled on the upper body position.
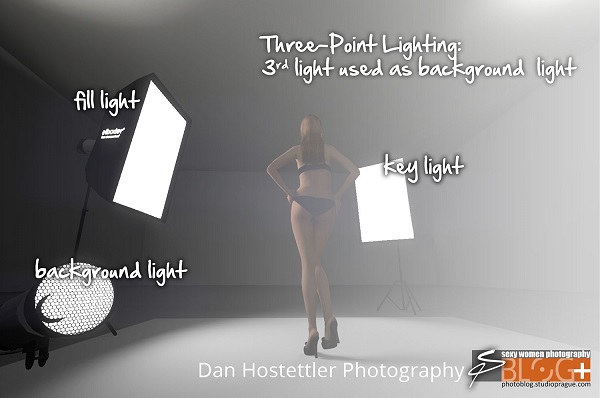
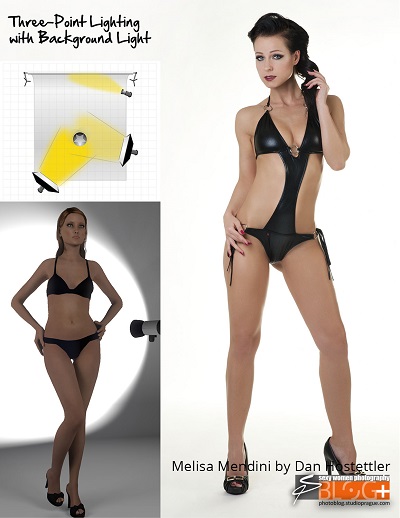
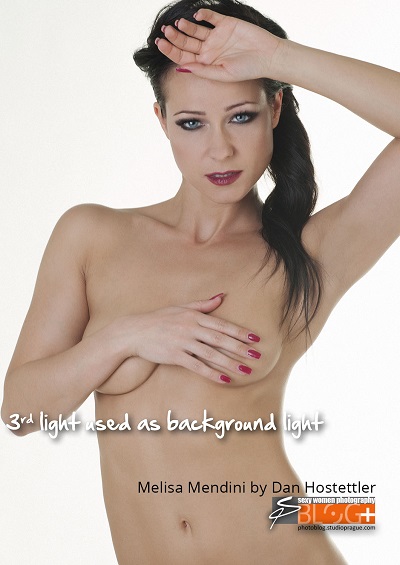
Last possibility on how to use the 3rd flash head is to actually illuminate the background and not the model itself.
When you use a white background without lightening it up, it will look greyish. So you can use number 3 for the backdrop but you will then again lose some nice effects on hair and body.
3 lights are great and very versatile for creating a lot of different designs (not only in the studio), yet a 4th head gives even more options – at least when you shoot more than just portraits, meaning three-quarter to full length shots.

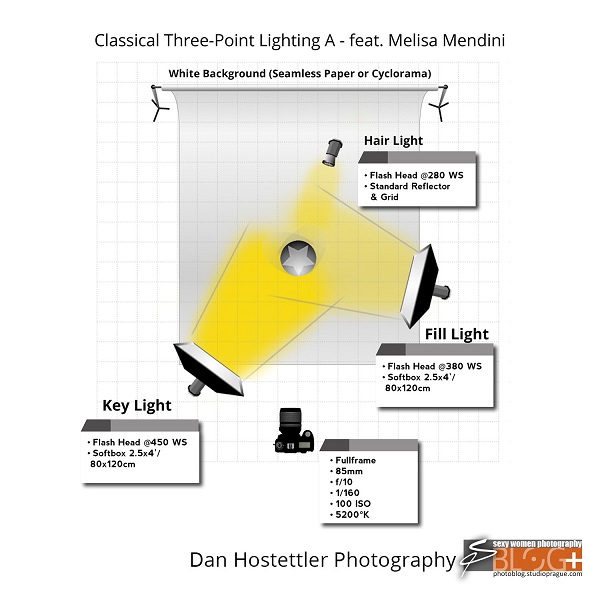

Tech
- 3x 400 Ws Monoblocs
- Key light: Softbox 2.5×4’ (80x120cm), powered around 250 Ws
- Fill-in light: Softbox 2.5×4’ (80x120cm), powered around 180 Ws
- Hair or Background light: Standard reflector with a 20 degree grid, powered approx. 250 Ws
- Nikon D700
- Nikkor AF 85mm / 1.8
Credits
- Photography: Dan Hostettler
- Model: Melisa Mendini
- Hair & Makeup: Aneta Lozkova
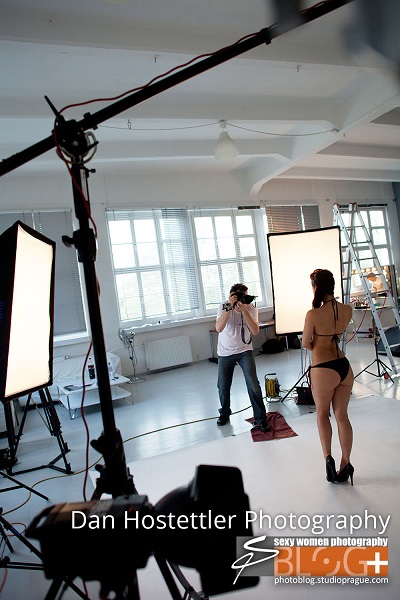
- BTS photography: Jan Prerovsky
Behind the Scenes


—
This is the part two in a series of excerpts from ESSENTIALS: Studio Lighting for Nude Photography, by Dan Hostettler.
If you liked this article there’s much in Dan’s 280 page book, which features Jenni Czech and Melisa Mendini, delivers the perfect “one size fits all” access: theory, showcases and exercises photography newcomers, amateurs, aficionados and versed pros.
And, Model Mayhem readers can get a 25% discount by using the promo code: MAYHEM25
Dan Hostettler
Dan has been a professional beauty and nude photographer for more than 15 years. He is Swiss born and currently living and working in Prague (Czech Republic). Dan founded his flagship business, StudioPrague, which includes a dedicated production company that has received international recognition and offers private, high-end workshops. Aside from his own creations, Dan has been internationally published and featured among others on and in GQ Online, The India Times, FashionONE TV, GoodLight Magazine, MUZE Magazine, FOTOdigital. His book,ESSENTIALS: Studio Lighting for Nude Photography, is on sale now.
Follow Me:


May 28, 2015 at 12:08 am, Photography Studies said:
Really well explained approach to lighting. I think I will save this link and show some of my students.
Cheers David
August 25, 2014 at 12:15 am, Panchia Photography said:
Hey Dan – thanks for posting this. A really clear cut guide, explanatory but not too technical, and quite fun :).
August 27, 2014 at 12:06 pm, Dan Hostettler said:
Hey Panchia, thanks for reading and your comment!
Very cool you like it 🙂
August 18, 2014 at 6:16 pm, Gregg said:
Dan I have been looking for this kind of a tutorial for a long time. Great job, tons of information and easy to understand, great diagrams as well.
One question though. In your classical 3 point lighting A & B you don’t list what the metered light was from each light only the cumulative amount could you share this info.
Thanks
Gregg
August 19, 2014 at 1:34 pm, Dan Hostettler said:
Hi Gregg, thanks for reading and your question!
The metered light is in my opinion not necessarily the best reference as it really depends e.g. in what distance and relation you build up the set, what f-stop is used etc.
Generally – and that’s missing here – I sense it’s better to provide the ratio.
So the ratio between key and fill was ca. 2.5:1.
The hair light is even harder to tell as Melisa has black hair. The hair-light-head was 40% less powered than the key, but using a std. reflector with grid makes it optically shine stronger.
I know this probably does not helps a lot but as said, exact f-stops, drew by the different heads, I never record separately. In my book “ESSENTIALS. Studio Lighting for Nude Photography” I provide additionally the ratios:)
Hope this gives an impression.
Best from Prague,
Dan
August 15, 2014 at 7:09 am, jordan said:
Hey dan,
Do you think purchasing a studio set from amazon is worth it? Even if i just start with one light?
August 15, 2014 at 3:45 pm, Dan Hostettler said:
Hey Jordan, thanks for reading and your question.
If you wanna start out with experimenting in studio lighting, a small investment is absolutely worth it. There are good beginner kits on Amazon, containing 2-3 flash heads, some umbrellas and sometimes even smaller softboxes.
You can start with heads up to 300 WS, in a smaller studio setting this power is more than enough.
I recommend to go with the same heads when purchasing to avoid confusion and stress on set when manipulating them.
Or have a look on Ebay; you great great used gear too!
Hope this helps and all the best on your photography journey!
August 13, 2014 at 8:50 pm, Stephanie said:
Great article, super helpful tutorial. Thanks!
August 14, 2014 at 1:35 pm, Dan Hostettler said:
Thanks for reading, Stephanie! Glad you get some bits out of it 🙂
August 13, 2014 at 7:07 pm, kono said:
dan, great tutorial! thanks for the write up. i just ordered 2 24×36 softboxes and i have an sb-600 flash as my backlight. would that setup work pretty well? i have 2 einsteins to use with the softboxes. thanks!
August 14, 2014 at 1:39 pm, Dan Hostettler said:
Hey Kono, thanks for reading and your comment!
Yeah your gear will work well for this setup. Take one 24×36/Einstein as a key, the other SB as fill and use your SB600 as hair or bkgnd light.
When using for hair, the power of a speedlight is strong enough. For the bkgnd depends on the size and distance but also there you should get decent results.
Have a good shoot!
August 14, 2014 at 2:57 pm, kono said:
thank you very much, Dan. will do!
August 13, 2014 at 5:59 pm, Nickolas Barakso said:
Awesome tutorial! Your explanation is detailed and well written, perfect for those just getting a handle with studio lighting, including myself. Thanks again for the invaluable resource.
August 14, 2014 at 1:36 pm, Dan Hostettler said:
Thanks for reading, Nickolas!
Have a great journey with studio lighting 🙂
August 13, 2014 at 3:40 pm, Alejandro Cervantes said:
I’m looking to do just that soon, so this is perfect timing! Thanks!
(I will say that the first pictures of the computer generated model are a little creepy looking…!)
August 13, 2014 at 4:50 pm, Dan Hostettler said:
Great, hope this will be of use for you Alejandro.
I agree, the 3D model is a matter of taste :-))) Model Melisa looks indeed better…
Have a good shoot ahead!
May 27, 2015 at 12:48 pm, Jim Jones said:
wonderful tips. Thanks much.
August 13, 2014 at 3:11 pm, ted adnan said:
Thanks Dan!
August 13, 2014 at 4:49 pm, Dan Hostettler said:
You’re most welcome Ted! Thanks for reading!